If you've found this website helpful, please click the Donate button. Thanks for the support.
Find this page useful and think a friend might too? Share it!
Find this page useful and think a friend might too? Share it!
Exercise Guide

Like the site? Sign up for the FREE newsletter. I'll send a new article once or twice a month. Unsubscribe
anytime.
anytime.

About this Site l Contact l Free Newsletter l Subscribe to Rss Feed
Recommended Products l Fitness Store l Directly Fitness Blog
Recommended Products l Fitness Store l Directly Fitness Blog
Continue to learn more about how to exercise in the Exercise Guide.
1. Dead Lift
Note:
This is a complex movement and takes practice before attempting to move heavy weight. This movement can be mastered using only your own bodyweight first to avoid injury.
Starting Position:
• Begin by standing in front of a barbell on the ground, feet slightly wider
than shoulder width, with toes pointed slight out.
• If you find this exercise too challenging for the mechanics of your legs,
try moving feet wider as this will open up your thighs and increase your
base of support.
• Your shins should be touching or very close to the barbell.
• Squat down so you can comfortably grip the bar with arms remaining
vertical.
• One hand should be using a supinated grip (palms up) while the other
using a pronated grip (overhand grip).
• Be sure to keep your buttocks low to the ground.
• Upper body and head should be straight with an upright posture and
tight abdominals.
• Your chest and buttocks sticking should look as if you are sticking them
out.
Upward Phase:
• Begin by contracting your traps and tensing the connection between the
bar and your arms.
• Drive your heels into the ground and contract your buttocks while
extending at the knees.
• The two previous steps should be done essentially at the same time
(this is where practice comes in).
• Keep chest out, keep a slight arch in the small of your back, and don’t
round back! This is the most common mistake and will lead to injury.
• Always concentrate on keeping your buttocks low and this will reduce
rounding of the back.
• Throughout movement keep the bar as close to your body as possible.
Even letting the bar ride up your shins and thighs is ideal (wear pants or
this may hurt).
• As you begin to reach the end of the movement, be sure to not lean
forward. Lean back slightly as knees are full extended. This is the end of
the up ward phase.
• Abs should be contracted throughout the movement. This is important as
it will keep the pressure around your core tight. It is your “natural belt”
which mimics many common power lifting belts.
• If you feel your core is weak, train this first and then attempt the dead
lift.
Downward Phase:
• Slowly lower the bar with your chest and buttocks sticking out.
• Make sure your body is upright!
• It is ideal to lower the bar as close to your legs as you can, just as in
the upward phase.
• It helps to keep upright posture by looking up while lowering (Neck
extension naturally influences the rest of the spine to extend).
• Make sure buttocks stays lower than your upper body as you descend.
• Movement is complete when weight touches the ground. Avoid dropping
the weight to the ground as this can damage the floor and very
unpleasant to fellow gym members.
Tips:
• This movement is very unnatural to most and will not come easily. Form
must be learned before attempting this exercise! Try looking at yourself
in the mirror while practicing with no added weight.
• This is a high intensity exercise as almost every major muscle is being
worked! Be sure to have lots of energy and focus when performing.
• Be sure to inhale on the way down and exhale on the way up! If you hold
your breath in you risk passing out in the middle of the movement!
2. Alternating Limb Lift
Starting Position:
• Begin by getting on your hands and knees over a mat.
• Trunk and neck should be parallel to the floor.
• You should be looking straight at the mat.
• Hips should be bent at 90 degrees to your trunk.
• Shoulders should be bent at 90 degrees to your trunk.
Upward Phase:
• Slowly raise one arm and the side leg simultaneously to 90 degrees.
• Other limbs will provide balance.
• Keep abdominals contracted throughout the exercise.
• Straighten out leg and arm as your raise them up.
• Pause once your leg and arm is in line with your trunk.
Downward Phase:
• Slowly lower your limbs down to the starting position.
• Bend your leg and arm as your come down to the starting position.
• The lowered limbs will now be the support.
• The other limbs should now be raised.
• Repeat this pattern until your desired repetitions are completed.
Tips:
• Keeping the abdominals contracted is key to this exercise allowing for strengthening of your core.
• Try adding weighted ankle bands to increase the intensity.
3. Supermans
Starting Position:
• Begin by laying down on a mat on your stomach.
• Entire body should be in a straight line.
• Keep head facing mat with a straight neck (Do not extend at neck).
• Keep abdominals contracted.
• Body should resemble a narrow “X” shape.
Upward Phase:
• Raise all four limbs simultaneously.
• Keep limbs straight.
• Contract abdominals.
• Motion is complete once you cannot raise limbs any further
Downward Phase:
• Slowly allow your limbs to lower.
• Stop just short of touching the mat and repeat desired repetitions.
• Keep abdominals contracted.
• Keep neck and trunk straight.
Tips:
• To make this exercise more challenging try putting your body in more of an “X” shape so your limbs are angled farther out from your body.
• You can also add ankle weights or hold the end position for an extended period of time in each rep.
4. Superman Variation: Alternating
Starting Position:
• Begin by laying down on a mat on your stomach.
• Entire body should be in a straight line.
• Keep head facing mat with a straight neck (Do not extend at neck).
• Keep abdominals contracted.
• Body should resemble a narrow “X” shape.
Upward Phase:
• Raise one arm and the opposite side leg simultaneously.
• Keep limbs straight.
• Contract abdominals.
• Motion is complete once you cannot raise limbs any further.
Downward Phase:
• Slowly allow your limbs to lower.
• Stop just short of touching the mat and repeat desired repetitions.
• Keep abdominals contracted.
• Keep neck and trunk straight.
Tips:
• To make this exercise more challenging try putting your body in more of
an “X” shape so your limbs are angled farther out from your body.
• You can also add ankle weights or hold the end position for an extended
period of time in each rep.
5. Supermans Behind the back
Starting Position:
• Begin by laying down on a mat on your stomach.
• Entire body should be in a straight line.
• Keep head facing mat with a straight neck (Do not extend at neck).
• Keep abdominals contracted.
• Place backs of hand on your lower back.
• Keep shoulders as far back as you can and chest sticking out.
Upward Phase:
• Raise legs and trunk simultaneously.
• Keep legs straight.
• Contract abdominals.
• Motion is complete once you cannot raise legs and trunk any further.
Downward Phase:
• Slowly allow your limbs to lower.
• Stop just short of touching the mat and repeat desired repetitions.
• Keep abdominals contracted.
• Keep neck and trunk straight.
Tips:
• To make this exercise more challenging try putting your body in more of
an “X” shape so your limbs are angled farther out from your body.
• You can also add ankle weights or hold the end position for an extended
period of time in each rep.
6. Back Extensions (On machine)
Starting Position:
• Begin by adjusting the height of the foot platform so that when you are
standing on it, the top of your thighs just below your hips is fixed.
• Lock feet into the platform with your legs and feet pointed forward.
• If your knees are uncomfortable, try adjusting the platform height.
• Put arms behind the back or cross them in front of your chest.
• Keep trunk and neck in line and upright.
Downward Phase:
• Slowly bend at the hips while maintaining a slight arch in the back.
• Do not round the back at any point!
• Bend until your body reaches approximately 90 degrees.
• Keep abdominals contracted the entire time.
Upward Phase:
• With a alight arch in your lower back, begin to raise your trunk.
• Stop Just short of the starting position to keep tension your muscles.
• Maintain contracted abdominals.
• Do not allow your legs to turn or flare out.
Tips:
• Try holding weight to your chest to make this exercise more challenging.
• Your hamstrings will also be worked during this movement so avoid this
exercise if your hamstrings are sore or at risk for cramping.
• You can also perform this exercise without the machine. Stand shoulder
width apart and bend at the waist to imitate this exercise. Remember to
keep the same posture.
Lower Back Exercises:
(In order of appearance)
1. Dead Lift
2. Alternating Leg Lift
3. Supermans
4. Alternating Supermans
5. Supermans Behind Back
6. Back Extensions
(In order of appearance)
1. Dead Lift
2. Alternating Leg Lift
3. Supermans
4. Alternating Supermans
5. Supermans Behind Back
6. Back Extensions
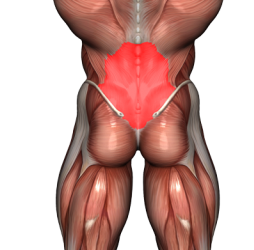
LOWER BACK EXERCISES
Exercises:
LOWER BACK