If you've found this website helpful, please click the Donate button. Thanks for the support.
Find this page useful and think someone else may too? Share it!
Find this page useful and think someone else may too? Share it!
Exercise Guide

Like the site? Sign up for the FREE newsletter. I'll send a new article once or twice a month. Unsubscribe
anytime.
anytime.

About this Site l Contact l Free Newsletter l Subscribe to Rss Feed
Recommended Products l Fitness Store l Directly Fitness Blog
Recommended Products l Fitness Store l Directly Fitness Blog
1. Seated Calf Raises
Starting Position:
• Begin by placing the desired weight on the appropriate racks.
• Sit and make sure the thigh pad is firmly placed and set.
• Grip handles and sit up tall.
• Be sure only first 1/4th of your front foot is on foot platform.
• Press up slightly with your toes and unlatching lever with weight.
Upward Phase:
• Plantar flex at the ankle so that you press off with your toes and your
heel is raised away from platform.
• Be sure thighs stay in straight line and don’t assist by swaying.
• Don’t pull up with your hand grips.
• Movement is complete once you cannot plantar flex any more (as high
as you can go).
Downward phase:
• Slowly lower the weight down in a controlled manner.
• Lower until heels go down as far as they can.
• This will most likely be below the starting position.
• Motion is complete once heels are slightly below starting point or you
cannot lower anymore.
• When finished be sure to latch lever back before attempting to get out
of seat.
Tips:
• Be sure not to bounce at the bottom as it is very tempting.
• Going down as far as you can is important to getting a full range of
motion.
• Most people will have tight calfs and going down may feel like a
stretch.
• Recommended that each rep go down slightly more to avoid cramps or
injury if calfs really tight.
2. Standing Calf Raises
Starting Position:
• Begin by finding a surface at least 2-3 inches off the ground for full
range of motion.
• If balance is an issue, make sure you have a grip or support in front of
you.
• Step at edge of platform with only 1/4th of the front of your foot
actually on platform.
• Your heels should be resting and hanging down off platform.
Upward Phase:
• Drive your toes into the platform until you reach as high as you are
able.
• Make sure to keep an upright posture and don’t lean forward,
backwards, or to the side.
• Be sure to keep legs and feet straight throughout movement. Don’t
point toes out or in.
Downward Phase:
• Slowly lower your body in a straight fashion until you cannot lower any
further.
• Be sure not to lean forward or backward.
Tips:
• Try exercise without any upper body support for a balancing challenge!
This will work out more stabilizer muscles as well.
• Try a wide and narrow stances on the platform to work the more outer
head of the gastrocnemius (Calf) muscle and inner head respectively.
• If balancing is an issue try to lock your eyes into focus on an object in
the room while performing the exercise.
3. Dorsiflexor Exercise
Starting Position:
• Can be done on a platform or without.
• Stand upright with only 1/4th back part of foot (heels) on platform if
using one.
• If standing simply lift toes off ground slightly into dorsiflexion (toes in
air).
Upward Phase:
• Raise toes into air as high as you can while keeping heels planed in
the ground.
• Be sure not to lose your balance and keep support nearby.
Downward Phase:
• Slowly lower your toes back down to the ground.
• Do not allow foot to slap down as this may cause injury.
Tips:
• Most people neglect to exercise your dorsiflexor (Extensors) muscles of
the lower leg. If you start to cramp or get tight muscles, stop exercise.
• I recommend adding 3 sets of 10 onto your normal workouts to build
yourself up.
• Try adding weight over your toes if you feel your body weight becomes
to easy.
A video that demonstrates a seated form of dorsiflexion (you can do this slowly while standing)
4. Calf Raises with Smith Machine
Starting Phase:
• Begin by placing a platform so that it lines up with the barbell on the
smith machine.
• You can also do this exercise without a platform but is more efficient
to use a platform.
• Begin by placing toes on platform while most of your foot hangs off the
back end of the platform.
• Make sure barbell is at about shoulder level.
• Adjust the barbell behind your neck and resting over your shoulders.
• Bend at the knees so that your body is upright and under the barbell.
• Keep head forward or up if you prefer.
• Unlatch the barbell so that you are bearing the weight.
Upward Phase:
• Press up with your toes until your knees become straight.
• Keep your knees in this position throughout the exercise.
• Plantar flex until you cannot rise anymore.
• Be sure to maintain upright posture, shoulders back, chest out, and
upright head.
• Abdominals should be contracted throughout for stability.
Downward Phase:
• Slowly lower down as your heels descend closer to the ground.
• Go down until you cannot descend any further.
• Make sure not to lean forward, keep your body upright.
• Knees should still be straight if performing more repetitions.
• If finished be sure to latch the weight carefully and lowering slowly
until you cannot feel the weight bearing down on your shoulders
anymore.
• Failure to make sure weight is latched prior to exiting will lead to
injury.
5. Calf Press with Leg Press Machine
Note: Many leg press machines will allow for the user to work the calf muscles depending on the foot platform angle and height
Starting Position:
• Begin by sitting in the appropriate position on the leg press machine
(this varies).
• Next place feet with only the first 1/4th the foot (toe end) lies on the
bottom of the platform.
• Make sure the platform is set further away so when you press there is
no need to press a far distance.
• This is because your legs will be straight throughout exercise.
• Grip handles located at sides of the machine.
• Feet should be approximately shoulder width apart or close, and legs
straight.
• Press up on platform enough to allow for unlatching of lever to allow
weight bearing.
Upward Phase:
• Press toes into platform until you cannot go any further.
• Be sure to keep back flat on padding, do not bend at waist.
• Pause and contract at top of movement.
Downward Phase:
• Slowly lower the weight until your heels cannot lower any further.
• Knees should remain straight.
• Keep legs straight until desired repetitions are complete.
• When ready to let weight down slightly bend at knees until platform
lowers to same level as when it was unlatched.
• Be sure to latch the weight correctly and slowly pull away from
platform to make sure weight is no longer bearing on your legs!
Tips:
• You may want to keep a “safety peg” in the machine just in case if the
weight falls for any reason it won’t crash onto your body.
• Note that is some cases it won’t even be necessary to unlatch or latch
the platform because your straight legs will be longer the platform to
your body.
• Try to widen the stance of your legs to stress the outer and inner parts
of your calf's.
6. Posterior Tibialis Band Raises
Note: You will need a band for this exercise
Starting Position:
• Tie band so that there is a small loop at the end (foot will go through)
• Next place loop over front of foot to be exercised.
• Band should be small enough as to not roll off the foot but not as tight
to cut off circulation to your foot.
• Step on about halfway the length of the band with the no exercising
leg.
• Cross exercising leg so ankle is directly over the non-exercising legs
knee area.
• Non-exercising leg should be at 90 degrees while pinning down part of
the band to the ground.
• Crossed over foot (exercising foot) with band should be hanging off the
lateral side of leg not being used.
Upward Phase:
• Begin by laterally flexing the exercising foot upwards so that your toes
point toward the ceiling and in towards your body at the same time.
• Your foot should make the shape of the letter “C”.
• You should feel this behind your medial ankle bone of the exercising
foot after a few repetitions.
• Movement is complete once your big toes cannot point any further up.
Downward Phase:
• Slowly lower back to the starting position.
• Do not allow foot to snap back.
• When finished switch the loop to the other foot and repeat exercise
with that leg.
Tips:
• This is where your posterior tibialis lies and is often untrained in
people.
• There are different colored bands that signify the strength of the band,
and thus the resistance. Try different colors to find a resistance for you.
• This exercise should be done with moderately higher repetitions (>8).
• If you have flat feet this exercise can strengthen your arches!
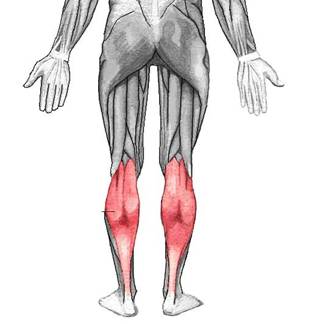
Lower Leg Exercises:
(In order of appearance)
1. Seated Calf Raises
2. Standing Calf Raises
3. Calf Raises with Smith Machine
4. Dorsiflexor Exercise
5. Calf Press on Leg Press Machine
6. Posterior Tibialis Raises
(In order of appearance)
1. Seated Calf Raises
2. Standing Calf Raises
3. Calf Raises with Smith Machine
4. Dorsiflexor Exercise
5. Calf Press on Leg Press Machine
6. Posterior Tibialis Raises
HOW TO EXERCISE
Exercises:
LOWER LEG EXERCISES