If you've found this website helpful, please click the Donate button. Thanks for the support.
Find this page useful and think a friend might too? Share it!
Find this page useful and think a friend might too? Share it!
1. Vertical Leg Crunches
Starting Position:
• Begin by back on a mat.
• Bend at the hips and place feet high in the air.
• There should be a slight bend at the knees.
• Everyone will have variations in flexibility so just raise hips as high as you
can.
• Place arms straight and out in front of you.
• Elevate upper body so that shoulders come off the mat.
Upward Phase:
• Try to reach your feet with your hands.
• Your upper back should come further off the mat.
• Do not swing up to try and reach your legs, just get as close as possible.
• Breathe out as you rise.
• Keep abdominals contracted throughout movement.
Downward Phase:
• Slowly control the movement back to just before your shoulders touch the
mat.
• Keep abdominals contracted.
• Breathe in as you lower back down.
• Repeat until desired repetitions are performed.
2. Crunches
Starting Position:
• Lay back on a mat with your knees bent at 90 degrees.
• Keep feet flat on the ground throughout exercise.
• Place arms in front of the chest crossed.
Upward Phase:
• Slowly curl our trunk up as you contract your abdominals.
• Do not use momentum to crunch up.
• Breathe out as you crunch up.
• Try to touch your elbows to your knees and pause for a second.
Downward Phase:
• Slowly control the motion backward.
• Your abs should still be contracted.
• Stop just short of your shoulder blades touching the mat.
• Repeat until desired repetitions are performed.
Tips:
• You can make this exercise more challenging by placing your hands behind
the head in the “relaxed position”.
• To make it even harder try stick your arms straight back without a bend at
the elbows.
• The entire crunch exercise is really only a few inches and not meant to be a
big movement.
• To really work those abdominals, breathe all the air out on the way up and
pause and contract before lowering your body.
3. Sit-Ups
Starting Position:
• Begin by placing your legs under something sturdy while sitting.
• This can be anything but for this example, dumbbells are used.
• Use heavy enough dumbbells to support your weight.
• Place feet underneath the dumbbell bars so that the bars are perpendicular
to your pointed straight feet.
• Once secure, lay back so that your knees are bent at 90 degrees.
• Place arms crossed in front of the chest.
Upward Phase:
• While keeping your back slightly arched (not rounded!) raise your body up to
your thighs
• Breathe out as you come up while contracting your abs.
• Movement is complete once you cannot sit up anymore from your thighs or if
you back begins to round.
Downward Phase:
• Slowly control the motion backwards.
• Abdominals should be contracted the entire time.
• Do not round back as you come down.
• Stop just before your shoulder blades touch the mat.
• Breathe in as you descend.
• Repeat exercise until the desired repetitions are completed.
Tips:
• Make the exercise harder by placing your hands behind the head (Don’t
support your head with the hands).
• Get creative with the supports for your feet. You can tuck them under a door
or have a friend place their knees on your feet.
• If you really want a challenge, hold some weights to your chest as you
perform this exercise.
4. Alternating Leg Lifts
Starting Position:
• Lay back on a mat with arms at the sides and hands flat.
• Raise head and shoulders off mat.
• Contract abdominals and lift legs approximately 6 inches off mat.
Upward Phase:
• Begin alternately raising one leg while lowering the other.
• The lowered leg should not contact the mat.
• Hands should not come off mat.
• Try not to use momentum from the rest of your body although slight
movement will and should occur.
• Keep abdominals tightened throughout.
Downward Phase:
• Now let your legs switch roles as the other rises this time.
• Keep abdominals contracted.
• Try to keep your shoulder blades off the floor as best you can.
Tips:
• If you want to make this exercise more challenging try adding ankle weights.
• As you get better at this exercise you will be able to raise your trunk higher
into the air while holding.
5. Alternating Leg Tucks
Starting Position:
• Begin by getting into the plank position: Body in a straight line, toes
pointed on mat, knees straight, arms straight, and hands flat on mat.
Upward Phase:
• Slowly bend one leg at the knee up to the chest.
• Keep abdominals contracted throughout motion.
• Breathe out as you bend leg.
• Movement is complete once you reach your chest or cannot flex your leg up
any farther.
Downward Phase:
• Slowly control the motion back to the starting position.
• Repeat with other leg in an alternating fashion.
• Be sure to stabilize with toes on mat before raising the other leg up.
• Don’t simply throw legs backwards; control the backwards motion of each
leg.
Tips:
• Try the “Mountain Climber” variation where one leg is bent towards the chest
while the other leg is simultaneously behind extended back. (In contrast to
one leg at a time motion)
6. Swiss Ball Crunches
Note:
There are many variations of crunches that can be done on the Swiss ball. The most common crunch will be explained here.
Starting Position:
• Get a Swiss ball that matches your height. Do this by making sure ball is at
knee level on the floor.
• Sit on the ball and make sure feet are at least shoulder width.
• Lay back so your shoulder blades are not contacting the ball.
• Place hands crossed in front of the chest.
• Head and neck should remain tucked and in line with your trunk.
Upward Position:
• Begin to crunch forwards as you try to touch your knees with your elbows.
• Knees should remain stationary and only as a target for your elbows.
• Do not allow knees to flare in or out.
• Breathe out as you contract your abdominals.
• Do not bounce off ball in attempt to reach further.
Downward Phase:
• Slowly control your trunk back down to the starting position by extending
your spine.
• Do not allow your upper back to rest on the ball.
• Don’t bounce backwards.
• Breathe out as you return to the starting position.
Tips:
• Try making the exercise harder by having a more narrow foot stance.
• Make the exercise easier by having a wider stance.
• Place your arms behind your head, straight back in line with your body, or
holding weights to make this exercise challenging.
7. Cable Crunches
Starting Position:
• Set a cable tower pulley with rope attachment approximately at the middle
level.
• Grasp rope with a neutral grip (palms toward each other).
• Kneel down with the rope in hand and back up until you feel resistance.
• Knees should be about shoulder width apart.
• Flex trunk forward so that you are gripping the rope behind the head.
• Feel free to rest body weight on legs if comfortable.
Downward Phase:
• Slowly contract the abdominals as you crunch in a down and inward direction.
• Contract your abdominals prior to moving to facilitate the initiation with your
abs.
• Do not extend your elbows in an effort to help move the weight.
• Don’t press your hands on your head to help press the weight downward.
• Movement is complete once you reach your thighs or cannot flex any further
at the trunk.
Upward Phase:
• Slowly control the motion back to approximately a 45 degree angle.
• This is the point when you will start to lose tension in your abdominals.
• Do not let weight heave you backwards as this can result in injury.
Tips:
• Try kneeling further away than usual to make the exercise harder.
• If you have sensitive knees it is recommended that you use a mat or
something comfortable underneath your knees.
8. Swiss Ball Walkouts (with side twist)
Starting Position:
• Begin by selecting the appropriate sized Swiss ball for your height.
• Do this by standing next to the ball. It should at knee level.
• Slowly lay forward on the ball with your stomach in contact with the ball.
Upward Position:
• You should slowly roll from your chest, to your stomach, to your legs over
the ball.
• Walkout past the ball on your arms to assist in rolling up over the ball.
• Your arms should be straight and hands flat on the ground supporting you.
• Legs should be entirely straight.
• Head and neck should be in line with your body.
• Only your feet should be in contact with the ball at this point.
• Now twist to one side, pause, twist to the other side, and pause.
• Twist until you feel tightness on the sides of your ribcage.
• After both twists, come back to the center.
Downward Phase:
• Slowly walk your hands backward as your body rolls back over the ball.
• Roll from your legs, to your hips, to your chest.
• Do not roll off the ball sideways as injury may occur (and incomplete
exercise).
• Once ball is under your chest, bend at the knees and plant your feet in the
ground to push off of.
• Press on the ground with your extended arms for support. Do not use ball.
• Caution: Do not put pressure on the ball because if it rolls over, you will fall.
Tips:
• Remember when you roll on ball your head will be about 4-5feet in front of
where you were originally. Plan your exercise space accordingly.
• There are many variations of this exercise and should be experimented with!
• You can avoid the twist altogether or substitute the twist for alternating arm
raises out in front of you.
• Try also using one leg for support at a time on the ball for a more advanced
challenge.
Starting Position:
• Begin by back on a mat.
• Bend at the hips and place feet high in the air.
• There should be a slight bend at the knees.
• Everyone will have variations in flexibility so just raise hips as high as you
can.
• Place arms straight and out in front of you.
• Elevate upper body so that shoulders come off the mat.
Upward Phase:
• Try to reach your feet with your hands.
• Your upper back should come further off the mat.
• Do not swing up to try and reach your legs, just get as close as possible.
• Breathe out as you rise.
• Keep abdominals contracted throughout movement.
Downward Phase:
• Slowly control the movement back to just before your shoulders touch the
mat.
• Keep abdominals contracted.
• Breathe in as you lower back down.
• Repeat until desired repetitions are performed.
2. Crunches
Starting Position:
• Lay back on a mat with your knees bent at 90 degrees.
• Keep feet flat on the ground throughout exercise.
• Place arms in front of the chest crossed.
Upward Phase:
• Slowly curl our trunk up as you contract your abdominals.
• Do not use momentum to crunch up.
• Breathe out as you crunch up.
• Try to touch your elbows to your knees and pause for a second.
Downward Phase:
• Slowly control the motion backward.
• Your abs should still be contracted.
• Stop just short of your shoulder blades touching the mat.
• Repeat until desired repetitions are performed.
Tips:
• You can make this exercise more challenging by placing your hands behind
the head in the “relaxed position”.
• To make it even harder try stick your arms straight back without a bend at
the elbows.
• The entire crunch exercise is really only a few inches and not meant to be a
big movement.
• To really work those abdominals, breathe all the air out on the way up and
pause and contract before lowering your body.
3. Sit-Ups
Starting Position:
• Begin by placing your legs under something sturdy while sitting.
• This can be anything but for this example, dumbbells are used.
• Use heavy enough dumbbells to support your weight.
• Place feet underneath the dumbbell bars so that the bars are perpendicular
to your pointed straight feet.
• Once secure, lay back so that your knees are bent at 90 degrees.
• Place arms crossed in front of the chest.
Upward Phase:
• While keeping your back slightly arched (not rounded!) raise your body up to
your thighs
• Breathe out as you come up while contracting your abs.
• Movement is complete once you cannot sit up anymore from your thighs or if
you back begins to round.
Downward Phase:
• Slowly control the motion backwards.
• Abdominals should be contracted the entire time.
• Do not round back as you come down.
• Stop just before your shoulder blades touch the mat.
• Breathe in as you descend.
• Repeat exercise until the desired repetitions are completed.
Tips:
• Make the exercise harder by placing your hands behind the head (Don’t
support your head with the hands).
• Get creative with the supports for your feet. You can tuck them under a door
or have a friend place their knees on your feet.
• If you really want a challenge, hold some weights to your chest as you
perform this exercise.
4. Alternating Leg Lifts
Starting Position:
• Lay back on a mat with arms at the sides and hands flat.
• Raise head and shoulders off mat.
• Contract abdominals and lift legs approximately 6 inches off mat.
Upward Phase:
• Begin alternately raising one leg while lowering the other.
• The lowered leg should not contact the mat.
• Hands should not come off mat.
• Try not to use momentum from the rest of your body although slight
movement will and should occur.
• Keep abdominals tightened throughout.
Downward Phase:
• Now let your legs switch roles as the other rises this time.
• Keep abdominals contracted.
• Try to keep your shoulder blades off the floor as best you can.
Tips:
• If you want to make this exercise more challenging try adding ankle weights.
• As you get better at this exercise you will be able to raise your trunk higher
into the air while holding.
5. Alternating Leg Tucks
Starting Position:
• Begin by getting into the plank position: Body in a straight line, toes
pointed on mat, knees straight, arms straight, and hands flat on mat.
Upward Phase:
• Slowly bend one leg at the knee up to the chest.
• Keep abdominals contracted throughout motion.
• Breathe out as you bend leg.
• Movement is complete once you reach your chest or cannot flex your leg up
any farther.
Downward Phase:
• Slowly control the motion back to the starting position.
• Repeat with other leg in an alternating fashion.
• Be sure to stabilize with toes on mat before raising the other leg up.
• Don’t simply throw legs backwards; control the backwards motion of each
leg.
Tips:
• Try the “Mountain Climber” variation where one leg is bent towards the chest
while the other leg is simultaneously behind extended back. (In contrast to
one leg at a time motion)
6. Swiss Ball Crunches
Note:
There are many variations of crunches that can be done on the Swiss ball. The most common crunch will be explained here.
Starting Position:
• Get a Swiss ball that matches your height. Do this by making sure ball is at
knee level on the floor.
• Sit on the ball and make sure feet are at least shoulder width.
• Lay back so your shoulder blades are not contacting the ball.
• Place hands crossed in front of the chest.
• Head and neck should remain tucked and in line with your trunk.
Upward Position:
• Begin to crunch forwards as you try to touch your knees with your elbows.
• Knees should remain stationary and only as a target for your elbows.
• Do not allow knees to flare in or out.
• Breathe out as you contract your abdominals.
• Do not bounce off ball in attempt to reach further.
Downward Phase:
• Slowly control your trunk back down to the starting position by extending
your spine.
• Do not allow your upper back to rest on the ball.
• Don’t bounce backwards.
• Breathe out as you return to the starting position.
Tips:
• Try making the exercise harder by having a more narrow foot stance.
• Make the exercise easier by having a wider stance.
• Place your arms behind your head, straight back in line with your body, or
holding weights to make this exercise challenging.
7. Cable Crunches
Starting Position:
• Set a cable tower pulley with rope attachment approximately at the middle
level.
• Grasp rope with a neutral grip (palms toward each other).
• Kneel down with the rope in hand and back up until you feel resistance.
• Knees should be about shoulder width apart.
• Flex trunk forward so that you are gripping the rope behind the head.
• Feel free to rest body weight on legs if comfortable.
Downward Phase:
• Slowly contract the abdominals as you crunch in a down and inward direction.
• Contract your abdominals prior to moving to facilitate the initiation with your
abs.
• Do not extend your elbows in an effort to help move the weight.
• Don’t press your hands on your head to help press the weight downward.
• Movement is complete once you reach your thighs or cannot flex any further
at the trunk.
Upward Phase:
• Slowly control the motion back to approximately a 45 degree angle.
• This is the point when you will start to lose tension in your abdominals.
• Do not let weight heave you backwards as this can result in injury.
Tips:
• Try kneeling further away than usual to make the exercise harder.
• If you have sensitive knees it is recommended that you use a mat or
something comfortable underneath your knees.
8. Swiss Ball Walkouts (with side twist)
Starting Position:
• Begin by selecting the appropriate sized Swiss ball for your height.
• Do this by standing next to the ball. It should at knee level.
• Slowly lay forward on the ball with your stomach in contact with the ball.
Upward Position:
• You should slowly roll from your chest, to your stomach, to your legs over
the ball.
• Walkout past the ball on your arms to assist in rolling up over the ball.
• Your arms should be straight and hands flat on the ground supporting you.
• Legs should be entirely straight.
• Head and neck should be in line with your body.
• Only your feet should be in contact with the ball at this point.
• Now twist to one side, pause, twist to the other side, and pause.
• Twist until you feel tightness on the sides of your ribcage.
• After both twists, come back to the center.
Downward Phase:
• Slowly walk your hands backward as your body rolls back over the ball.
• Roll from your legs, to your hips, to your chest.
• Do not roll off the ball sideways as injury may occur (and incomplete
exercise).
• Once ball is under your chest, bend at the knees and plant your feet in the
ground to push off of.
• Press on the ground with your extended arms for support. Do not use ball.
• Caution: Do not put pressure on the ball because if it rolls over, you will fall.
Tips:
• Remember when you roll on ball your head will be about 4-5feet in front of
where you were originally. Plan your exercise space accordingly.
• There are many variations of this exercise and should be experimented with!
• You can avoid the twist altogether or substitute the twist for alternating arm
raises out in front of you.
• Try also using one leg for support at a time on the ball for a more advanced
challenge.
Exercise Guide

Like the site? Sign up for the FREE newsletter. I'll send a new article once or twice a month. Unsubscribe
anytime.
anytime.

About this Site l Contact l Free Newsletter l Subscribe to Rss Feed
Recommended Products l Fitness Store l Directly Fitness Blog
Recommended Products l Fitness Store l Directly Fitness Blog
Continue to learn more about how to exercise in the Exercise Guide.
HOW TO EXERCISE
Abs Exercises:
(In order of appearance)
1. Vertical Leg Crunches
2. Standard Crunches
3. Sit-Ups
4. Alternating Leg Lifts
5. Alternating Leg Tucks
6. Swiss Ball Crunches
7. Cable Crunches
8. Swiss Ball Walkouts
(In order of appearance)
1. Vertical Leg Crunches
2. Standard Crunches
3. Sit-Ups
4. Alternating Leg Lifts
5. Alternating Leg Tucks
6. Swiss Ball Crunches
7. Cable Crunches
8. Swiss Ball Walkouts
Exercises:
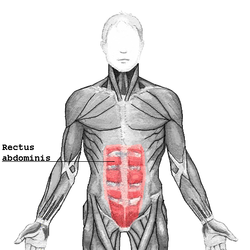
ABDOMINALS