Exercise Guide
1. Standing Triceps Cable Extension
Starting Position:
• Cable level should be at a height that will allow
for resistance when elbow extension occurs
(usually highest level is best).
• Stand tall with feet shoulder width apart.
• If using a rope device: Hands should be gripped
so that palms are facing inwards.
• If using a bar device: Hand should be gripped
so that palms are facing downwards.
• Knees should be slightly bent.
• You may place one foot forward if this is more
comfortable or known back issues are present,
but always maintain a straight upright back posture.
• Pull down weight so elbows are at sides and
forearms are parallel to the floor. This is the
starting position.
Downward Movement Phase:
• Extend the elbows so that only your forearms are
moving and your upper arms are stationary.
• Continue elbow extension until you cannot extend
anymore (if you have shoulder issues, stopping shy
of full elbow extension is a good idea).
• Maintain elbows at sides throughout movement.
• Contract abdominals throughout movement as
this will help maintain posture and prevent injury
(also a bonus ab workout).
Upward Movement Phase:
• Slowly allow your arms to come back to the
starting position with forearms parallel to the
ground.
• Allowing weight to snap back to starting position
can result in injury.
• Keep abdominals contracted and maintain straight
back and slightly bent knee posture.
• Keep elbows tucked.
• Movement is completed when forearms reach at or
slightly above parallel.
2. Underhand Triceps Cable Extension:
Starting Position:
• Cable level should be at a height that will allow for
resistance when elbow extension occurs (usually
highest level is best).
• Stand tall with feet shoulder width apart.
• Use an underhand grip with palms facing up on bar.
• Knees should be slightly bent.
• You may place one foot forward if this is more
comfortable or known back issues are present, but
always maintain a straight upright back posture.
• Pull down weight so elbows are at sides and forearms
are parallel to the floor. This is the starting position.
Downward Movement Phase:
• Extend the elbows so that only your forearms are moving
and your upper arms are stationary.
• Continue elbow extension until you cannot extend
anymore (if you have shoulder issues, stopping shy of full
elbow extension is a good idea).
• Maintain elbows at sides throughout movement.
• Contract abdominals throughout movement as this will
help maintain posture and prevent injury (also a bonus
ab workout).
Upward Movement Phase:
• Slowly allow your arms to come back to the starting
position with forearms parallel to the ground.
• Allowing weight to snap back to starting position can
result in injury.
• Keep abdominals contracted and maintain straight back
and slightly bent knee posture.
• Keep elbows tucked.
• Movement is completed when forearms reach at or
slightly above parallel.
3. Dips on tower:
Starting Position:
• Facing toward tower, hands should use a
neutral palms facing toward body grip.
• Feet should be placed on footsteps.
• Stand tall.
Downward Movement Phase:
• Take feet off footsteps and allow weight to shift
to your arms.
• You may cross your legs if you like.
• Maintain a straight back and don’t allow your body
to tip forwards.
• Slowly lower yourself straight down without
letting elbows flare out.
• Head should maintain a forward facing position.
• Movement complete when elbows are parallel
with the floor.
• Going further than parallel can result in injury if
caution is not taken. Past parallel isn’t
recommended.
Upward Movement Phase:
• Extend elbows until your body rises as high as it
will go.
• Be sure elbows do flare out and your body
doesn’t shift forward or backward.
• Don’t lock out elbows, stop just shy of full elbow
extension to avoid injury.
• Movement is complete when you reach this point.
• Be sure to place feet on footsteps when finished with
repetitions.
6. Dips on benches:
Starting Position:
• Begin by placing two benches parallel to each
other approx. 4-5 feet apart depending on your
height.
• Place feet in front of one bench facing away and
toward the other (you should be in-between
benches).
• Place hands with palms facing downward on edge
of bench that is behind you while facing toward
other bench.
• Crouch down and pick feet up to place on bench
in front of you.
• Edge of hands should be on one bench and feet
should be on other bench.
• Legs should be straight.
• Torso should be upright and your body should
resemble the letter “L”.
• To make the exercise easier you may also only
use one bench and instead of placing your feet
on that bench, you may place them on the
ground.
Downward Movement Phase:
• Begin by slowly lowering yourself down while
maintaining straight legs and torso.
• Try to keep elbows from flaring outwards.
• Continue descent until upper arms are parallel to
the floor (further descent should be avoided as to
prevent injury).
• Your bottom should not touch the ground at the
lowest point. If it does your benches are not tall
enough.
Upward Movement Phase:
• Extend your elbows until you reach just shy of full
elbow extension.
• Maintain upright torso posture, straight legs, elbows
at sides, and palms facing downward.
• You should be back in the starting position.
4. Triceps Kickbacks:
Starting Position:
• Stand parallel next to a bench on the right side
with dumbbell on in right hand with palm facing toward.
• Bend left leg and place left leg on bench with knee
planted on bench and place left hand further up on
bench palms facing downward (gripping edge works
best).
• You should have both left extremities on bench and
right extremities off bench in a bent over position.
• Right foot should be at 90 degrees and planted firmly
on ground. Right upper arm should be parallel to torso
with forearm perpendicular and hanging down with
weight.
Upward Movement Phase:
• Keeping elbows tucked in at sides, slowly contract your
right triceps to extend elbow and raise weight. This
should be the only part of your body moving. All other
extremities are for support.
• Kickback weight until forearm is just shy of parallel
with the floor. Your whole arm should now be parallel to
the floor and your body.
Downward Movement Phase:
• Allow weight to slowly lower back down to the starting
position.
• Keep torso parallel to the ground and elbow tucked in at side.
• Upper arm should not move, only forearm.
• Repeat on the other side. Do this by standing on left side of
bench, placing right hand and knee on bench with left foot
planted and left hand with the dumbbell
*Note: If you prefer you can do this exercise without the bench (perhaps bad wrists). Just make sure you have support with the hand that isn’t holding the dumbbell on something sturdy. Bend over as far as you feel comfortable but not past 90 degrees. Just make sure upper arm is parallel to body even if body isn’t parallel to the floor.
5. Narrow Push-up:
Starting Position:
• Assume a traditional push-up position with hands slightly
wider than shoulder width, elbows slightly bent, torso
straight, legs together and straight, and toes pointed
toward ground.
• Now move your hands to slightly narrower than shoulder
This is the only difference.
• Be sure your body is in a straight line. Contraction of
abdominals throughout can help with this.
• If uncomfortable to your wrist you may turn hands slightly
inward.
• This is the starting position.
Downward Movement Phase:
• Keeping elbows from flaring out slowly lower your body
until just a few inches from the ground or your chest/body
begins to touch the ground (whichever occurs first).
• Maintain straight head, torso, and legs throughout motion.
Upward Movement Phase:
• Press into the ground extending your elbow until back into
the starting position.
• Straight posture should be kept throughout body and elbows
at sides.
• Movement is complete when just shy of full elbow extension
is reached.
Starting Position:
• Stand parallel next to a bench on the right side
with dumbbell on in right hand with palm facing toward.
• Bend left leg and place left leg on bench with knee
planted on bench and place left hand further up on
bench palms facing downward (gripping edge works
best).
• You should have both left extremities on bench and
right extremities off bench in a bent over position.
• Right foot should be at 90 degrees and planted firmly
on ground. Right upper arm should be parallel to torso
with forearm perpendicular and hanging down with
weight.
Upward Movement Phase:
• Keeping elbows tucked in at sides, slowly contract your
right triceps to extend elbow and raise weight. This
should be the only part of your body moving. All other
extremities are for support.
• Kickback weight until forearm is just shy of parallel
with the floor. Your whole arm should now be parallel to
the floor and your body.
Downward Movement Phase:
• Allow weight to slowly lower back down to the starting
position.
• Keep torso parallel to the ground and elbow tucked in at side.
• Upper arm should not move, only forearm.
• Repeat on the other side. Do this by standing on left side of
bench, placing right hand and knee on bench with left foot
planted and left hand with the dumbbell
*Note: If you prefer you can do this exercise without the bench (perhaps bad wrists). Just make sure you have support with the hand that isn’t holding the dumbbell on something sturdy. Bend over as far as you feel comfortable but not past 90 degrees. Just make sure upper arm is parallel to body even if body isn’t parallel to the floor.
5. Narrow Push-up:
Starting Position:
• Assume a traditional push-up position with hands slightly
wider than shoulder width, elbows slightly bent, torso
straight, legs together and straight, and toes pointed
toward ground.
• Now move your hands to slightly narrower than shoulder
This is the only difference.
• Be sure your body is in a straight line. Contraction of
abdominals throughout can help with this.
• If uncomfortable to your wrist you may turn hands slightly
inward.
• This is the starting position.
Downward Movement Phase:
• Keeping elbows from flaring out slowly lower your body
until just a few inches from the ground or your chest/body
begins to touch the ground (whichever occurs first).
• Maintain straight head, torso, and legs throughout motion.
Upward Movement Phase:
• Press into the ground extending your elbow until back into
the starting position.
• Straight posture should be kept throughout body and elbows
at sides.
• Movement is complete when just shy of full elbow extension
is reached.
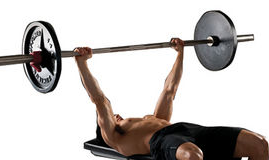
7. Lying Triceps Extensions
Starting Position:
• Lay back on a bench with your knees bent at 90 degrees
and feet planted firmly on floor.
• Grip a flat or E-Z bar with palms facing forward and arms
perpendicular to your body.
• You should look like your about to perform a bench press.
Downward Movement Phase:
• Begin by lowering your forearms slowly to just above
your forehead.
• Bar should not come within a few inches of touching your
head.
• Take caution as to not let weight lower too fast as injury
could occur.
• Your upper arms should be stationary throughout the
exercise, only your forearms should move.
Upward Movement Phase:
• Extend your elbows up to just short of locking out your
elbows.
• Tighten your core by contracting your abdominals.
• Keep wrist in a neutral position.
• Try not to let elbows flare out.
• Movement is complete once arms are just short of fully
extended.
*Note: Use a weight that is light enough that it wont cause you harm. If failure in muscles occurs during the downward phase, lower the bar back behind your head onto the bench (place head a few inches away from end of bench before starting)
HOW TO EXERCISE

Triceps Exercises:
(In order of appearance)
1. Standing Triceps Cable
Extension
2. Underhand Triceps Cable
Extension
3. Dips (on tower)
4. Triceps Kickbacks
5. Narrow Push-up
6. Dips (on benches)
7. Lying Triceps Extension
(In order of appearance)
1. Standing Triceps Cable
Extension
2. Underhand Triceps Cable
Extension
3. Dips (on tower)
4. Triceps Kickbacks
5. Narrow Push-up
6. Dips (on benches)
7. Lying Triceps Extension
Find this site useful? Click the donate button. Its greatly appreciated.
Think a friend might benefit from this page? Share it!
Think a friend might benefit from this page? Share it!
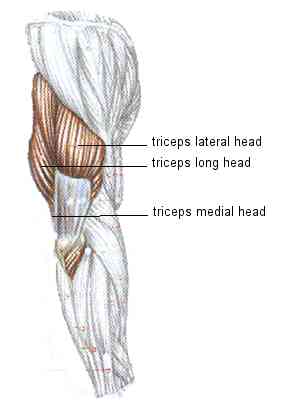
Exercises:
TRICEPS