If you've found this website helpful, please click the Donate button. Thanks for the support.
Find this page useful and think a friend might too? Share it!
Find this page useful and think a friend might too? Share it!
1. Wrist Curls with Barbell
Starting Position:
• Begin by kneeling down in front of a padded bench.
• Place forearms on bench (palms up).
• Hands should be hanging loosely off end with a loose grip on weight.
• Keep elbows directly under your shoulders.
• Don’t let elbows flare out.
Upward Phase:
• Curl the weight up only flexing at the wrist.
• No movement should occur at the elbows.
• Curl up until you cannot go up any further.
• Pause and contract your forearms at the top of the movement.
Downward Phase:
• Slowly allow your hands to uncurl the weight.
• Do not allow the weight to unroll all the way to the ends of your fingers.
• Stop just short of this and repeat desired repetition range.
Tips:
• If you find that a flat bar is uncomfortable for your wrist, try an E-Z Bar or
another curved bar.
• You can also try to grip slightly wider or narrower than shoulder width for a
more comfortable wrist position.
2. Wrist Roller Exercise
Starting Position:
• Begin with wrist rolling bar in both hands.
• Use an overhand, palms down grip.
• Stand upright and tall with a slight bend at the elbows.
• Rope should have enough slack to just be hanging off the floor.
Upward Phase:
• Begin to roll up the weight on the rope by extending at the wrists.
• Extend one wrist at a time in a repeated fashion.
• Repeat action until the weight meets the bar.
Downward Phase:
• Begin to let the weight on the rope down by flexing at the wrists.
• Flex one wrist at a time in a repeated fashion.
• Repeat action until weight reaches the floor.
Tips:
• You can hold your arms straight out (perpendicular to floor) as this will use
additional muscles to stabilize the arms.
• Try rolling up and down multiple times in a row before increasing weight
3. Standing Barbell Wrist Curls
Starting Position:
• Begin by standing in front of a barbell on a waist level rack.
• Grasp bar (palms facing forward) in front of thighs.
• Arms should be hanging down with barbell in hand.
• Keep good posture with a flat back, shoulders back, and chest out.
• Knees should also be slightly bent.
• Barbell should be loosely gripped by hands.
Upward Phase:
• Curl the barbell up by flexing at both wrists simultaneously.
• Pause at the top of the movement while contracting forearms.
• Do not allow elbows to bend or shoulders to rise.
Downward Phase:
• Allow barbell to slowly uncurl your hands.
• Do not allow barbell to roll all the way to fingertips- Stop just shy of this.
• Only movement at the forearms should occur.
• Walk forward or bend at the knees to lower weight on rack.
Tips:
• If grasping the barbell in front is uncomfortable, try grabbing the bar in back
of the body; just be sure to keep back flat.
• Try using a thicker barbell to make exercise harder.
• Try using a thinner barbell to increase weight lifted.
4. Seated Reverse Wrist Curls
Starting Position:
• Sit near the end of a padded bench.
• Grip barbell overhand (palms down).
• Let wrist hang over edges of bench with weight in hand.
• Rest elbows and forearms on bench or top of thighs.
• Do not round back, keep it flat.
• Keep feet flat on the ground throughout movement.
Upward Phase:
• Extend at the wrist to lift barbell as high as you can.
• Only the wrist should be moving.
• Do not allow the elbows to flare in or out.
• Do not pick forearms or elbows off bench or thighs.
Downward Phase:
• Slowly lower barbell down to just before the starting position.
• Do not allow barbell to uncurl your hands all the way to the finger tips.
• Only wrist should be controlling motion.
• When finished with desired reps, get body over barbell before attempting to
pick up (while standing). Injury to forearm extensors is possible when simply
lifting your arms upward when already fatigued.
Tips:
• If this exercise is uncomfortable for your wrist try sliding the wrist either out
or in from the starting position.
• Some will find it more comfortable to use an E-Z Bar due to its slanted grip
(compared to flat straight bar).
• Be aware that you will not be able to lift as much weight with this exercise
as wrist curls.
5. Seated Cable Wrist Curls
Starting Position:
• Begin by placing a padded bench in front of the cable tower.
• Sit with feet flat on the ground.
• Grasp bar attachment with an underhand (palms up) grip.
• Allow backs of forearms to rest on tops of thighs above knees.
• Do not allow back to round, keep flat.
Upward Position:
• Slowly curl up bar by flexing at the wrist.
• Do not allow elbows to move in any direction.
• Motion is complete once you cannot flex wrist any higher.
• Pause and contract forearms at this point.
Downward Phase:
• Allow bar to slowly lower by extending at the wrist.
• Do not allow elbows to move in any direction.
• Do not allow bar to uncurl your hands all the way to the finger tips.
• Motion is complete once the bar uncurls just before this point.
Tips:
• Try experimenting with grip width and elbow position if this exercise bothers
any of your joints.
• Just always be sure to keep elbows where they are throughout exercise.
• Variations in grip attachments can be used for this exercise as well.
6. Reverse Preacher Curls
Starting Position:
• Sit on a preacher curl bench.
• Grip the E-Z bar with an overhand grip (palms down).
• Place arms on top of the preacher arm pad until your armpits meet the mat.
• Adjust seat height if needed.
• Elbows should be touching preacher pad no more than shoulder width.
• Keep chest up and shoulders back.
Upward Phase:
• Begin by bending at the elbow as you bring your hands to your chest.
• Keep the wrist rigid and straight.
• Do not flare elbows in or out to assist the movement.
• Movement is complete when you can no longer curl bar up or the bar is
directly over the wrist.
• Keep feet flat on the floor.
Downward Phase:
• Slowly control the weight back down in the arching motion you raised it.
• Keep the wrist rigid and don’t allow them to bend forward.
• Keep feet flat on the floor.
• Stop just short of your forearms touching the mat.
• Complete the desired amount of repetitions before racking E-Z Bar.
Tips:
• Know you will not be using a lot of weight with this exercise.
• If gripping an E-Z Bar is uncomfortable for you, try using a flat bar.
7. Behind Back Barbell Wrist Curls
Starting Line:
• Begin by standing in front of a barbell on a waist level rack.
• Grasp bar (palms facing backward) behind back shoulder width.
• Keep good posture with a flat back, shoulders back, and chest out.
• Knees should also be slightly bent.
• Barbell should be loosely gripped by hands.
Upward Phase:
• Curl the barbell up by flexing at both wrists simultaneously.
• Pause at the top of the movement while contracting forearms.
• Do not allow elbows to bend or shoulders to rise.
Downward Phase:
• Allow barbell to slowly uncurl your hands.
• Do not allow barbell to roll all the way to fingertips- Stop just shy of this.
• Only movement at the forearms should occur.
• Walk forward or bend down to lower weight on rack.
Tips:
• If grasping the barbell behind the back is uncomfortable, try grabbing the
bar in front of the body; just be sure to keep back flat.
• Try using a thicker barbell to make exercise harder.
• Try using a thinner barbell to increase weight lifted.
8. Standing Dumbbell Wrist Curls
Starting Position:
• Stand tall with selected dumbbells at sides.
• Make sure your palms are facing toward your body.
• Arms should be hanging straight down with no bend in the elbow.
• Feet should be pointed forward.
• Only a slight bend at the knees should be present if comfortable.
Upward Phase:
• Slowly curl weight up alongside the body.
• If needed, slightly lift dumbbell out from body to make room.
• Curl up until you cannot go further.
• Be sure to not bend at elbows (If lifting out to side a slight elbow bend is
fine)
• Don’t allow wrist to rotate, keep palms directly facing inward toward body.
Downward Phase:
• Slowly control dumbbells down as your hands un-curl the weight.
• Don’t allow weight to reach all the way to the finger tips.
• Stop the downward movement just shy of this point.
• Keep elbows in the same position you curled the weight.
• When reps are completed, uncurl hands and wrist all the way.
Tips:
• Some people may find this exercise awkward as their arm bio mechanics
don’t allow them to curl the weight up without hitting the sides of the body.
(Especially with the heavier and bigger sized dumbbells.
• Try lifting slightly out from side, if that doesn’t work try another wrist curl
exercise such as standing barbell wrist curls.
Starting Position:
• Begin by kneeling down in front of a padded bench.
• Place forearms on bench (palms up).
• Hands should be hanging loosely off end with a loose grip on weight.
• Keep elbows directly under your shoulders.
• Don’t let elbows flare out.
Upward Phase:
• Curl the weight up only flexing at the wrist.
• No movement should occur at the elbows.
• Curl up until you cannot go up any further.
• Pause and contract your forearms at the top of the movement.
Downward Phase:
• Slowly allow your hands to uncurl the weight.
• Do not allow the weight to unroll all the way to the ends of your fingers.
• Stop just short of this and repeat desired repetition range.
Tips:
• If you find that a flat bar is uncomfortable for your wrist, try an E-Z Bar or
another curved bar.
• You can also try to grip slightly wider or narrower than shoulder width for a
more comfortable wrist position.
2. Wrist Roller Exercise
Starting Position:
• Begin with wrist rolling bar in both hands.
• Use an overhand, palms down grip.
• Stand upright and tall with a slight bend at the elbows.
• Rope should have enough slack to just be hanging off the floor.
Upward Phase:
• Begin to roll up the weight on the rope by extending at the wrists.
• Extend one wrist at a time in a repeated fashion.
• Repeat action until the weight meets the bar.
Downward Phase:
• Begin to let the weight on the rope down by flexing at the wrists.
• Flex one wrist at a time in a repeated fashion.
• Repeat action until weight reaches the floor.
Tips:
• You can hold your arms straight out (perpendicular to floor) as this will use
additional muscles to stabilize the arms.
• Try rolling up and down multiple times in a row before increasing weight
3. Standing Barbell Wrist Curls
Starting Position:
• Begin by standing in front of a barbell on a waist level rack.
• Grasp bar (palms facing forward) in front of thighs.
• Arms should be hanging down with barbell in hand.
• Keep good posture with a flat back, shoulders back, and chest out.
• Knees should also be slightly bent.
• Barbell should be loosely gripped by hands.
Upward Phase:
• Curl the barbell up by flexing at both wrists simultaneously.
• Pause at the top of the movement while contracting forearms.
• Do not allow elbows to bend or shoulders to rise.
Downward Phase:
• Allow barbell to slowly uncurl your hands.
• Do not allow barbell to roll all the way to fingertips- Stop just shy of this.
• Only movement at the forearms should occur.
• Walk forward or bend at the knees to lower weight on rack.
Tips:
• If grasping the barbell in front is uncomfortable, try grabbing the bar in back
of the body; just be sure to keep back flat.
• Try using a thicker barbell to make exercise harder.
• Try using a thinner barbell to increase weight lifted.
4. Seated Reverse Wrist Curls
Starting Position:
• Sit near the end of a padded bench.
• Grip barbell overhand (palms down).
• Let wrist hang over edges of bench with weight in hand.
• Rest elbows and forearms on bench or top of thighs.
• Do not round back, keep it flat.
• Keep feet flat on the ground throughout movement.
Upward Phase:
• Extend at the wrist to lift barbell as high as you can.
• Only the wrist should be moving.
• Do not allow the elbows to flare in or out.
• Do not pick forearms or elbows off bench or thighs.
Downward Phase:
• Slowly lower barbell down to just before the starting position.
• Do not allow barbell to uncurl your hands all the way to the finger tips.
• Only wrist should be controlling motion.
• When finished with desired reps, get body over barbell before attempting to
pick up (while standing). Injury to forearm extensors is possible when simply
lifting your arms upward when already fatigued.
Tips:
• If this exercise is uncomfortable for your wrist try sliding the wrist either out
or in from the starting position.
• Some will find it more comfortable to use an E-Z Bar due to its slanted grip
(compared to flat straight bar).
• Be aware that you will not be able to lift as much weight with this exercise
as wrist curls.
5. Seated Cable Wrist Curls
Starting Position:
• Begin by placing a padded bench in front of the cable tower.
• Sit with feet flat on the ground.
• Grasp bar attachment with an underhand (palms up) grip.
• Allow backs of forearms to rest on tops of thighs above knees.
• Do not allow back to round, keep flat.
Upward Position:
• Slowly curl up bar by flexing at the wrist.
• Do not allow elbows to move in any direction.
• Motion is complete once you cannot flex wrist any higher.
• Pause and contract forearms at this point.
Downward Phase:
• Allow bar to slowly lower by extending at the wrist.
• Do not allow elbows to move in any direction.
• Do not allow bar to uncurl your hands all the way to the finger tips.
• Motion is complete once the bar uncurls just before this point.
Tips:
• Try experimenting with grip width and elbow position if this exercise bothers
any of your joints.
• Just always be sure to keep elbows where they are throughout exercise.
• Variations in grip attachments can be used for this exercise as well.
6. Reverse Preacher Curls
Starting Position:
• Sit on a preacher curl bench.
• Grip the E-Z bar with an overhand grip (palms down).
• Place arms on top of the preacher arm pad until your armpits meet the mat.
• Adjust seat height if needed.
• Elbows should be touching preacher pad no more than shoulder width.
• Keep chest up and shoulders back.
Upward Phase:
• Begin by bending at the elbow as you bring your hands to your chest.
• Keep the wrist rigid and straight.
• Do not flare elbows in or out to assist the movement.
• Movement is complete when you can no longer curl bar up or the bar is
directly over the wrist.
• Keep feet flat on the floor.
Downward Phase:
• Slowly control the weight back down in the arching motion you raised it.
• Keep the wrist rigid and don’t allow them to bend forward.
• Keep feet flat on the floor.
• Stop just short of your forearms touching the mat.
• Complete the desired amount of repetitions before racking E-Z Bar.
Tips:
• Know you will not be using a lot of weight with this exercise.
• If gripping an E-Z Bar is uncomfortable for you, try using a flat bar.
7. Behind Back Barbell Wrist Curls
Starting Line:
• Begin by standing in front of a barbell on a waist level rack.
• Grasp bar (palms facing backward) behind back shoulder width.
• Keep good posture with a flat back, shoulders back, and chest out.
• Knees should also be slightly bent.
• Barbell should be loosely gripped by hands.
Upward Phase:
• Curl the barbell up by flexing at both wrists simultaneously.
• Pause at the top of the movement while contracting forearms.
• Do not allow elbows to bend or shoulders to rise.
Downward Phase:
• Allow barbell to slowly uncurl your hands.
• Do not allow barbell to roll all the way to fingertips- Stop just shy of this.
• Only movement at the forearms should occur.
• Walk forward or bend down to lower weight on rack.
Tips:
• If grasping the barbell behind the back is uncomfortable, try grabbing the
bar in front of the body; just be sure to keep back flat.
• Try using a thicker barbell to make exercise harder.
• Try using a thinner barbell to increase weight lifted.
8. Standing Dumbbell Wrist Curls
Starting Position:
• Stand tall with selected dumbbells at sides.
• Make sure your palms are facing toward your body.
• Arms should be hanging straight down with no bend in the elbow.
• Feet should be pointed forward.
• Only a slight bend at the knees should be present if comfortable.
Upward Phase:
• Slowly curl weight up alongside the body.
• If needed, slightly lift dumbbell out from body to make room.
• Curl up until you cannot go further.
• Be sure to not bend at elbows (If lifting out to side a slight elbow bend is
fine)
• Don’t allow wrist to rotate, keep palms directly facing inward toward body.
Downward Phase:
• Slowly control dumbbells down as your hands un-curl the weight.
• Don’t allow weight to reach all the way to the finger tips.
• Stop the downward movement just shy of this point.
• Keep elbows in the same position you curled the weight.
• When reps are completed, uncurl hands and wrist all the way.
Tips:
• Some people may find this exercise awkward as their arm bio mechanics
don’t allow them to curl the weight up without hitting the sides of the body.
(Especially with the heavier and bigger sized dumbbells.
• Try lifting slightly out from side, if that doesn’t work try another wrist curl
exercise such as standing barbell wrist curls.
Exercise Guide

Like the site? Sign up for the FREE newsletter. I'll send a new article once or twice a month. Unsubscribe
anytime.
anytime.

About this Site l Contact l Free Newsletter l Subscribe to Rss Feed
Recommended Products l Fitness Store l Directly Fitness Blog
Recommended Products l Fitness Store l Directly Fitness Blog
Continue to learn more about how to exercise in the Exercise Guide.
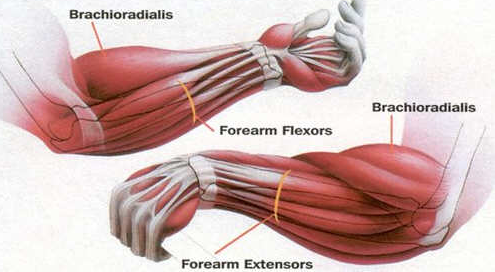
FOREARM EXERCISES
Forearm Exercises:
(In order of appearance)
1. Wrist Curls with Barbell
2. Wrist Rolls
3. Standing Barbell Wrist Curls
4. Seated Reverse Wrist Curls
5. Seated Cable Wrist Curls
6. Reverse Preacher Curls
7. Barbell Wirst Curls (Behind
Back)
8. Standing Dumbbell Wrist
Curls
(In order of appearance)
1. Wrist Curls with Barbell
2. Wrist Rolls
3. Standing Barbell Wrist Curls
4. Seated Reverse Wrist Curls
5. Seated Cable Wrist Curls
6. Reverse Preacher Curls
7. Barbell Wirst Curls (Behind
Back)
8. Standing Dumbbell Wrist
Curls
Exercises:
FOREARM EXERCISES