If you've found this website helpful, please click the Donate button. Thanks for the support.
Exercise Guide

Like the site? Sign up for the FREE newsletter. I'll send a new article once or twice a month. Unsubscribe
anytime.
anytime.

About this Site l Contact l Free Newsletter l Subscribe to Rss Feed
Recommended Products l Fitness Store l Directly Fitness Blog
Recommended Products l Fitness Store l Directly Fitness Blog
1. The Dead Lift:
Note: This is a complex movement and takes practice before attempting to move heavy weight. This movement can be mastered using only your own bodyweight first to avoid injury.
Starting Position:
• Begin by standing in front of a barbell on the ground, feet slightly
wider than shoulder width, with toes pointed slight out.
• If you find this exercise too challenging for the mechanics of your legs, try
moving feet wider as this will open up your thighs and increase your base of
support.
• Your shins should be touching or very close to the barbell.
• Squat down so you can comfortably grip the bar with arms remaining
vertical.
• One hand should be using a supinated grip (palms up) while the other using
a pronated grip (overhand grip).
• Be sure to keep your buttocks low to the ground.
• Upper body and head should be straight with an upright posture and tight
abdominals.
• Your chest and buttocks sticking should look as if you are sticking them
out.
Upward Phase:
• Begin by contracting your traps and tensing the connection between the bar
and your arms.
• Drive your heels into the ground and contract your buttocks while extending
at the knees.
• The two previous steps should be done essentially at the same time (this
is where practice comes in).
• Keep chest out, keep a slight arch in the small of your back, and don’t
round back! This is the most common mistake and will lead to injury.
• Always concentrate on keeping your buttocks low and this will reduce
rounding of the back.
• Throughout movement keep the bar as close to your body as possible. Even
letting the bar ride up your shins and thighs is ideal (wear pants or this may
hurt).
• As you begin to reach the end of the movement, be sure to not lean
forward. Lean back slightly as knees are full extended. This is the end of
the up ward phase.
• Abs should be contracted throughout the movement. This is important as it
will keep the pressure around your core tight. It is your “natural belt” which
mimics many common power lifting belts.
• If you feel your core is weak, train this first and then attempt the dead lift.
Downward Phase:
• Slowly lower the bar with your chest and buttocks sticking out.
• Make sure your body is upright!
• It is ideal to lower the bar as close to your legs as you can, just as in the
upward phase.
• It helps to keep upright posture by looking up while lowering (Neck
extension naturally influences the rest of the spine to extend).
• Make sure buttocks stays lower than your upper body as you descend.
• Movement is complete when weight touches the ground. Avoid dropping the
weight to the ground as this can damage the floor and very unpleasant to
fellow gym members.
Tips:
• This movement is very unnatural to most and will not come easily. Form
must be learned before attempting this exercise! Try looking at yourself in
the mirror while practicing with no added weight.
• This is a high intensity exercise as almost every major muscle is being
worked! Be sure to have lots of energy and focus when performing.
• Be sure to inhale on the way down and exhale on the way up! If you hold
your breath in you risk passing out in the middle of the movement!
2. Cable Hamstring Curls:
Starting Position:
• Begin by selecting a “loop” attachment to place on a cable tower. There are
many variations and many will work for this exercise (most use Velcro that
wrap around your ankle or foot).
• Set the level of the cable tower to the lowest setting.
• Place the attachment around your ankle or around your foot depending on
the attachment on the exercising leg (the other leg will be the support).
• Face away from the tower and be sure to have something to grip for
support if needed. You can also face toward the tower if you have nothing
else to support you.
• Stand straight about a foot away from the cable tower or until the cable
becomes tense.
• This will most likely cause the leg strapped to be slightly flexed back and is
fine as long as there is tension in the cable.
Upward Phase:
• Begin by contracting your hamstrings, driving the back of your ankles
toward your buttocks.
• Try not to excessively arch your back during the motion (some is natural).
• Movement is complete once you cannot flex at the knees any further. This
will usually happen as a result of your heels meeting your buttocks or the
weights in the tower not physically able to allow more motion (they run into
the top of the tower).
Downward Phase:
• Slowly allow the weight to lower back down in an arching motion.
• Do not allow the weight to slam back as this may cause injury to your
knees.
• At any time during this exercise if you feel pain in your knees, stop the
exercise!
Tips:
• Try dorsi-flexing (bring toes upward toward head) your lower legs to work
hamstrings harder.
• If you want to work out your calves as well, try plantar flexing at your
ankles (point toes as if standing on your tippy toes) throughout exercise.
3. Laying Leg Curl’s
Starting Position:
• Begin by laying down over the padding contoured to put your hips in a
flexed position.
• Next be sure to set the lower leg pad to a length that allows the back of your ankles to come into contact during rest (but not too tight!).
• Your legs should be extended (or near) while laying.
• Grip the handles with both hands.
Upward Phase:
• Begin by contracting your hamstrings, driving the back of your ankles into
the padding to flex your legs.
• This will be against gravity and as such you will not be able to use as much
weight as with the “seated leg curl machine”.
• Try not to excessively arch your back during the motion (some is natural).
• Movement is complete once you cannot flex at the knees any further. This
will usually happen as a result of your heels meeting your buttocks.
Downward Phase:
• Slowly allow the weight to lower back down in an arching motion guided by
the machine.
• Do not allow the weight to slam back as this may cause injury to your
knees.
• At any time during this exercise if you feel pain in your knees, stop the
exercise!
• This exercise will feel fine for some and bothersome for others.
Tips:
• Try dorsi-flexing (bring toes upward toward head) your lower legs to work
hamstrings harder.
• If you want to work out your calves as well, try plantar flexing at your
ankles (point toes as if standing on your tippy toes) throughout exercise.
4. Seated Leg Curl’s:
Note: This exercise is most commonly performed on machines but can be done with ankle weights. I will be explaining the exercise as it related to the machine but the same concept can be used with ankle weights
Starting Position:
• Begin by setting the back seat padding to meet firmly on your back when
you sit.
• Next be sure to set the lower leg pad to a length that allows the back of
your ankles to rest on it during rest.
• Legs should be straight out in front of you and not turned or bent in any
way.
• Your legs should be extended (or near) while seated.
• Grip the handles with both hands.
• Be sure to set padding that covers the top of your thighs (not padding near
ankles) so it firmly holds your thighs in place.
• Do not allow thigh padding to lay over knees! This will most definitely lead
to injury. Above the knee caps is the proper space to place the padding
firmly.
• This will be important once you begin the exercise.
Downward Phase:
• Begin by contracting your hamstrings, driving the back of your ankles into
the padding to flex your legs.
• Try to keep your back flat as the natural tendency will be to arch.
• Movement is complete once you cannot flex at the knees any further.
Upward Phase:
• Slowly allow the weight to rise back up in an arch motion guided by the
machine.
• Do not allow the weight to slam back as this may cause injury to your
knees.
• At any time during this exercise if you feel pain in your knees, stop the
exercise!
• This exercise will feel fine for some and bother others knees.
Tips:
• Try dorsi-flexing (bring toes upward toward head) your lower legs to work
hamstrings harder.
• If you want to work out your calves as well, try plantar flexing at your
ankles (point toes as if standing on your tippy toes) throughout exercise
5. Squats:
Note: This is a complex exercise to perform correctly. Try practicing this motion with just your own body weight before proceeding to use dumbbells or a barbell. I will explain using a barbell as this is the most complex. If using your own body weight simply cross your arms across your chest. The rest of the exercise is the same movement.
Starting position:
• Begin by standing in front of a racked barbell.
• Be sure that your max height is about ½ to ¾ taller than the barbell.
• Back up so back of neck is touching barbell and bar is resting on shoulders.
• Press feet into ground through heels to lift bar slightly off the rack
(extending legs).
• Back up so there is enough clearance in front and below you (some racks
have “safety” bars about 3 feet off the ground should you fall with the
weight).
• Feet should be slight wider than shoulder width apart and toes slightly
pointed out from neutral.
• This is the squat starting position.
Downward Phase:
• Keep your head straight or look up if you prefer (many find it easier to
maintain upright posture by looking up).
• Be sure to keep this upright posture and abdominals tight!
• Don’t lean forward at any point in the movement. This can lead to injury!
• Stick butt out and slowly lower yourself concentrating on shifting most of
your weight through your heels, not your toes.
• Lower slowly until your knees are flexed to about 90 degrees.
• Squats can also be done with “partial reps” if you don’t feel comfortable
going down that far.
• Be sure to inhale on your way down.
Upward Phase:
• Drive your feet into the ground while contracting your buttocks.
• Try to concentrate using force from your heels rather than your toes.
• Exhale during this phase of the exercise.
• Be sure not to lean too far forward or backward.
• Your natural tendency will be to lean forward but keep your chest out and
straight posture.
• Keep knees in line and don’t let them wobble in or out excessively.
• It will take practice to keep a good posture during this exercise.
• Once you are back in the starting position you can either repeat or re rack
the bar by stepping forward and placing bar appropriately.
• Be sure to slowly dip away from bar just in case the bar isn’t racked
properly.
Tips:
• This is an unnatural position to be in and require practice with no added
weight to perfect the form. Try using a mirror while performing the squat
sideways to see if you are leaning too far forward.
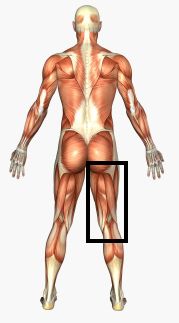
Hamstrings Exercises:
(In order of appearance)
1. Dead lift
2. Cable Hamstring Curls
3. Laying Leg Curls
4. Seated Leg Curls
5. Squats
(In order of appearance)
1. Dead lift
2. Cable Hamstring Curls
3. Laying Leg Curls
4. Seated Leg Curls
5. Squats
HOW TO EXERCISE
Find this Page useful and think a friend might too? Share it:
Exercises:
HAMSTRINGS