If you've found this website helpful, please click the Donate button. Thanks for the support.
Find this page useful and think someone else may too? Share it!
Find this page useful and think someone else may too? Share it!
Exercise Guide

Like the site? Sign up for the FREE newsletter. I'll send a new article once or twice a month. Unsubscribe
anytime.
anytime.

About this Site l Contact l Free Newsletter l Subscribe to Rss Feed
Recommended Products l Fitness Store l Directly Fitness Blog
Recommended Products l Fitness Store l Directly Fitness Blog
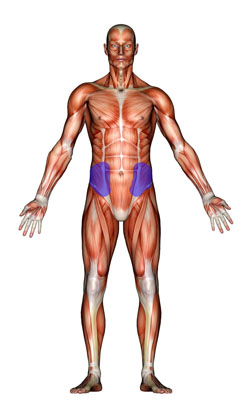
Obliques Exercises:
(In order of appearance)
1. Side-lying Oblique Raise
2. Obliques Cross Crunch
3. Bicycle Crunches
4. Oblique Side Crunches
5. Swiss Ball Crunches
6. Oblique Cable Crunches
7. Oblique Cable Twists
8. Wood Chops
(In order of appearance)
1. Side-lying Oblique Raise
2. Obliques Cross Crunch
3. Bicycle Crunches
4. Oblique Side Crunches
5. Swiss Ball Crunches
6. Oblique Cable Crunches
7. Oblique Cable Twists
8. Wood Chops
HOW TO EXERCISE
Exercises:
OBLIQUES EXERCISES

1. Side Lying Oblique Raise
Starting Position:
• Begin by lying on your side on a mat.
• Put the arm closest to the floor straight out at 90 degrees from your body
for support or behind the head.
• Leg should be in line with your body and knees slightly bent.
• Feet should be directly on top of one another.
• Other arm should be simply tucked across your chest or touching side of
head toward ceiling.
• Head and neck should be off the mat and straight with your body.
Upward Position:
• Slowly contract your side obliques as your trunk bends upward.
• This is not a big movement and should not be led with your head.
• Keep neck entirely straight as you bend with the body.
• Side crunch up until you feel your obliques tighten and hold for a second.
• Do not use arm closest to floor to push on mat and lift your trunk up.
Downward Phase:
• Slowly lower your trunk in a controlled manner to the start position.
• Keep neck and head straight and in line with trunk.
• Do not simply drop back down to the mat.
Tips:
• If you tend to roll backwards or forwards during this exercise, try sticking your
lower arm out at 90 degrees in front of you for stability.
• Putting your lower arm closer to your body will decrease stability, and thus
increase muscle activity (more challenging)
No video available for this exercise. Sorry for the inconvenience.
2. Obliques Cross Crunch
Starting Position:
• Begin by back on a mat.
• Bend at the hips and place feet high in the air.
• There should be a slight bend at the knees.
• Everyone will have variations in flexibility so just raise hips as high as you
can.
• Bend at the elbows and touch the sides of your head with your finger tips.
• Do not support your head with hands.
• Elevate upper body so that shoulders come off the mat.
Upward Phase:
• Try to reach elbow to your opposite knee.
• Your upper back should come further off the mat on that side.
• Do not swing up to try and reach your legs, just get as close as possible.
• Breathe out as you rise.
• Keep abdominals contracted throughout movement.
Downward Phase:
• Slowly control the movement back to just before your shoulders touch the
mat.
• Keep abdominals contracted.
• Breathe in as you lower back down.
• Now reach other knee with other elbow.
• Legs should remain in the air for entire exercise.
• Repeat until desired repetitions are performed.
Tips:
• If you cannot hold your legs in the air for that long, try going for as long as
you can and then placing your feet on the ground for the remainder of the
exercise.
• Try reaching past your knee to get an even better muscle contraction.
3. Bicycle Crunches
Starting Position:
• Lay back on a mat with your knees bent at 90 degrees.
• Keep feet off the mat throughout exercise.
• Bend at the elbows with finger tips barely touching the sides of your head.
• This is to avoid supporting your head with your hands.
• Lift shoulders off mat in a slightly crunched position.
Upward Phase:
• Slowly curl our trunk up as you reach your right elbow to your left knee.
• Simultaneously bring your left knee to your right elbow.
• Your other leg not involved will be extended straight out.
• When repeated this will resemble riding a bike.
• Breathe out as you crunch up.
Downward Phase:
• Slowly control the motion backward as you extend your left leg now and
raise your right knee (previously extended) to your left elbow.
• This exercise is really one continuous motion.
• Your trunk is simply twisting back and forth while your knees take turns
being extended and bent to your elbows.
• Your abs should still be contracted.
• Repeat until desired repetitions are performed.
Tips:
• To really work those abdominals, breathe all the air out on the way up and
pause and contract before lowering your body.
• Try counting time and not repetitions with this exercise. Pick a time frame
(use a watch or clock) and continue this exercise until it is met. You will get
a much better workout than counting reps.
4. Side Planks
Starting Position:
• Begin by lying on your side on a mat.
• Lean on elbow bent at 90 degrees with forearm perpendicular to your body.
• Elbow should be right underneath the shoulder.
• Legs should be straight and in line with your body.
• Feet can be on top of each other or you can extend the bottom leg back just
enough to get the bottom foot behind the top foot.
Upward Phase:
• Slowly raise your hips upward toward the ceiling until your body is in a
straight line.
• This is not a big movement.
• Hold this position for the desired length of time.
• Other arm can be pointed toward ceiling in a straight line or lying along the
side of your body.
• It is important to engage your entire core during this exercise.
• Try imagining sucking your belly button to your spine to engage the
transverse abdominals.
Downward Phase:
• Slowly control the motion back towards the floor until your hips are in full
contact with the floor.
• Do not simply drop down to the floor.
• Repeat exercise on the other side.
Tips:
• If you tend to sway forward or backward you may want to extended the
bottom leg and place the foot behind the top foot.
• If you have strong wrist and want more of a challenge try using a straight
arm for support rather than a bend arm described here.
• People with wrist issues should use the bent arm method.
5. Oblique Swiss Ball Crunches
Starting Position:
• Get a Swiss ball that matches your height. Do this by making sure ball is at
knee level on the floor.
• Sit on the ball and make sure feet are at least shoulder width.
• Lay back so your shoulder blades are not contacting the ball.
• Cross arms across your chest.
• Head and neck should remain tucked and in line with your trunk
Upward Position:
• Begin to crunch forwards as you try to touch your elbow to your opposite side
knee.
• Knees should remain motionless and feet flat on the ground.
• Do not allow knees to flare in or out.
• Breathe out as you contract your abdominals.
• Do not bounce up to knees, use a slow controlled motion.
Downward Phase:
• Slowly control your trunk back down to the starting position by extending
your spine.
• Do not allow your upper back to rest on the ball.
• Don’t bounce backwards.
• Breathe out as you return to the starting position.
Tips:
• Try making the exercise harder by having a more narrow foot stance.
• Make the exercise easier by having a wider stance.
• Place your arms behind your head, straight back in line with your body, or
holding weights to make this exercise challenging.
6. Oblique Cable Crunches
Starting Position:
• Set a cable tower pulley with rope attachment approximately at the middle
level.
• Grasp rope with a neutral grip (palms toward each other).
• Kneel down with the rope in hand and back up until you feel resistance.
• Knees should be about shoulder width apart.
• Flex trunk forward so that you are gripping the rope behind the head.
• Feel free to rest body weight on legs if comfortable.
Downward Phase:
• Slowly contract the abdominals as you crunch in a down trying to touch your
elbow to your opposite knee.
• Contract your abdominals prior to moving the rest of your body to facilitate
the initiation with your abs muscles.
• Do not extend your elbows in an effort to help move the weight.
• Don’t press your hands on your head to help press the weight downward.
• Movement is complete once you reach your thighs or cannot flex and twist
any further at the trunk.
Upward Phase:
• Slowly control the motion back to approximately a 45 degree angle of trunk
flexion facing straight forward.
• This is the point when you will start to lose tension in your abdominals.
• Do not let weight heave you backwards as this can result in injury.
• Repeat exercise, but this time try to touch the other elbow to your opposite
knee.
• Repeat the desired repetitions.
Tips:
• Try kneeling further away than usual to make the exercise harder.
• If you have sensitive knees it is recommended that you use a mat or something comfortable underneath your knees.
7. Standing Oblique Cable Twists
Starting Position:
• Begin by setting the cable pulley on a cable tower to shoulder level.
• Use a standard single handle bar attachment.
• Stand with your side towards the cable tower.
• Grasp grip with hand closest to the grip so that your palm is facing inward
toward you.
• Grasp grip with other hand on grip so that your palm is facing inward toward
tower. This grip will be overlapping your other hand.
• Side step out until you feel the resistance with straight arms out to your
side.
• Maintain an upright and straight torso.
• No twisting should be present in your torso or legs.
• You should be standing straight up with our arms straight and pulled towards
your side (tower side).
Upward Phase:
• Initiate movement by first contracting your abs.
• Then slowly twist your arms in a semicircular motion from you side to in front
on you.
• Arms should remain straight throughout motion.
• Stop when you reach just past 90 degrees or rotation (arms straight out in
front of body).
• Keep head, neck, torso, and legs straight forward and motionless.
Downward Phase:
• In a controlled manner, slowly allow your arms to make a semicircular path
back to the starting position.
• Arms should remain straight.
• Do not allow the torso to twist.
• Repeat the desired amount of repetitions on this side.
• Then repeat on the other side obliques.
Tips:
• Keep in mind that your body is at a mechanical disadvantage here and the
weight you will use will not be very heavy. Light weight is all that’s needed.
• Try experimenting with cable pulley height so twisting can occur at an angle.
• If you knees begin to bother you, try slightly bending them during the
exercise.
8. Wood Chops
Starting Position:
• Begin by setting the cable pulley on a cable tower to the top level.
• Be sure to put on a single grip attachment.
• Stand with your side facing the cable tower.
• Grasp the grip with the cable tower side arm.
• Then grasp the grip with the other arm. Overlapping of hands will occur.
• You should be standing straight and tall with feet shoulder width apart and
knees slightly bent. Arms should be up and out the side with a slight bend
at the elbows.
• If you are not in this position try lowering the cable pulley height.
Downward Phase:
• Contract your obliques to initiate the movement.
• Follow this with your arms as you make a chopping movement in a downward
diagonal motion to the opposite side of the cable tower.
• Be sure to not hoist the weight down with momentum.
• Be sure to keep a slight bend at the elbows and don’t allow more bending or
straightening to occur.
• Movement is complete when your arms are straight across you at a diagonal
angle.
Upward Phase:
• Allow weight to slowly be pulled in an upward diagonal direction.
• Control this movement. Do not let the weight crash.
• Keep elbows slightly bent.
• Keep head and neck straight and facing forward.
Tips:
• Try using a rope attachment on the cable tower for an extra squeeze on those obliques.
• Try to focus on using your obliques to pull weight down. The tendency will be for you to use your arms to pull weight down. Initiate movement with the abs.
Starting Position:
• Begin by lying on your side on a mat.
• Put the arm closest to the floor straight out at 90 degrees from your body
for support or behind the head.
• Leg should be in line with your body and knees slightly bent.
• Feet should be directly on top of one another.
• Other arm should be simply tucked across your chest or touching side of
head toward ceiling.
• Head and neck should be off the mat and straight with your body.
Upward Position:
• Slowly contract your side obliques as your trunk bends upward.
• This is not a big movement and should not be led with your head.
• Keep neck entirely straight as you bend with the body.
• Side crunch up until you feel your obliques tighten and hold for a second.
• Do not use arm closest to floor to push on mat and lift your trunk up.
Downward Phase:
• Slowly lower your trunk in a controlled manner to the start position.
• Keep neck and head straight and in line with trunk.
• Do not simply drop back down to the mat.
Tips:
• If you tend to roll backwards or forwards during this exercise, try sticking your
lower arm out at 90 degrees in front of you for stability.
• Putting your lower arm closer to your body will decrease stability, and thus
increase muscle activity (more challenging)
No video available for this exercise. Sorry for the inconvenience.
2. Obliques Cross Crunch
Starting Position:
• Begin by back on a mat.
• Bend at the hips and place feet high in the air.
• There should be a slight bend at the knees.
• Everyone will have variations in flexibility so just raise hips as high as you
can.
• Bend at the elbows and touch the sides of your head with your finger tips.
• Do not support your head with hands.
• Elevate upper body so that shoulders come off the mat.
Upward Phase:
• Try to reach elbow to your opposite knee.
• Your upper back should come further off the mat on that side.
• Do not swing up to try and reach your legs, just get as close as possible.
• Breathe out as you rise.
• Keep abdominals contracted throughout movement.
Downward Phase:
• Slowly control the movement back to just before your shoulders touch the
mat.
• Keep abdominals contracted.
• Breathe in as you lower back down.
• Now reach other knee with other elbow.
• Legs should remain in the air for entire exercise.
• Repeat until desired repetitions are performed.
Tips:
• If you cannot hold your legs in the air for that long, try going for as long as
you can and then placing your feet on the ground for the remainder of the
exercise.
• Try reaching past your knee to get an even better muscle contraction.
3. Bicycle Crunches
Starting Position:
• Lay back on a mat with your knees bent at 90 degrees.
• Keep feet off the mat throughout exercise.
• Bend at the elbows with finger tips barely touching the sides of your head.
• This is to avoid supporting your head with your hands.
• Lift shoulders off mat in a slightly crunched position.
Upward Phase:
• Slowly curl our trunk up as you reach your right elbow to your left knee.
• Simultaneously bring your left knee to your right elbow.
• Your other leg not involved will be extended straight out.
• When repeated this will resemble riding a bike.
• Breathe out as you crunch up.
Downward Phase:
• Slowly control the motion backward as you extend your left leg now and
raise your right knee (previously extended) to your left elbow.
• This exercise is really one continuous motion.
• Your trunk is simply twisting back and forth while your knees take turns
being extended and bent to your elbows.
• Your abs should still be contracted.
• Repeat until desired repetitions are performed.
Tips:
• To really work those abdominals, breathe all the air out on the way up and
pause and contract before lowering your body.
• Try counting time and not repetitions with this exercise. Pick a time frame
(use a watch or clock) and continue this exercise until it is met. You will get
a much better workout than counting reps.
4. Side Planks
Starting Position:
• Begin by lying on your side on a mat.
• Lean on elbow bent at 90 degrees with forearm perpendicular to your body.
• Elbow should be right underneath the shoulder.
• Legs should be straight and in line with your body.
• Feet can be on top of each other or you can extend the bottom leg back just
enough to get the bottom foot behind the top foot.
Upward Phase:
• Slowly raise your hips upward toward the ceiling until your body is in a
straight line.
• This is not a big movement.
• Hold this position for the desired length of time.
• Other arm can be pointed toward ceiling in a straight line or lying along the
side of your body.
• It is important to engage your entire core during this exercise.
• Try imagining sucking your belly button to your spine to engage the
transverse abdominals.
Downward Phase:
• Slowly control the motion back towards the floor until your hips are in full
contact with the floor.
• Do not simply drop down to the floor.
• Repeat exercise on the other side.
Tips:
• If you tend to sway forward or backward you may want to extended the
bottom leg and place the foot behind the top foot.
• If you have strong wrist and want more of a challenge try using a straight
arm for support rather than a bend arm described here.
• People with wrist issues should use the bent arm method.
5. Oblique Swiss Ball Crunches
Starting Position:
• Get a Swiss ball that matches your height. Do this by making sure ball is at
knee level on the floor.
• Sit on the ball and make sure feet are at least shoulder width.
• Lay back so your shoulder blades are not contacting the ball.
• Cross arms across your chest.
• Head and neck should remain tucked and in line with your trunk
Upward Position:
• Begin to crunch forwards as you try to touch your elbow to your opposite side
knee.
• Knees should remain motionless and feet flat on the ground.
• Do not allow knees to flare in or out.
• Breathe out as you contract your abdominals.
• Do not bounce up to knees, use a slow controlled motion.
Downward Phase:
• Slowly control your trunk back down to the starting position by extending
your spine.
• Do not allow your upper back to rest on the ball.
• Don’t bounce backwards.
• Breathe out as you return to the starting position.
Tips:
• Try making the exercise harder by having a more narrow foot stance.
• Make the exercise easier by having a wider stance.
• Place your arms behind your head, straight back in line with your body, or
holding weights to make this exercise challenging.
6. Oblique Cable Crunches
Starting Position:
• Set a cable tower pulley with rope attachment approximately at the middle
level.
• Grasp rope with a neutral grip (palms toward each other).
• Kneel down with the rope in hand and back up until you feel resistance.
• Knees should be about shoulder width apart.
• Flex trunk forward so that you are gripping the rope behind the head.
• Feel free to rest body weight on legs if comfortable.
Downward Phase:
• Slowly contract the abdominals as you crunch in a down trying to touch your
elbow to your opposite knee.
• Contract your abdominals prior to moving the rest of your body to facilitate
the initiation with your abs muscles.
• Do not extend your elbows in an effort to help move the weight.
• Don’t press your hands on your head to help press the weight downward.
• Movement is complete once you reach your thighs or cannot flex and twist
any further at the trunk.
Upward Phase:
• Slowly control the motion back to approximately a 45 degree angle of trunk
flexion facing straight forward.
• This is the point when you will start to lose tension in your abdominals.
• Do not let weight heave you backwards as this can result in injury.
• Repeat exercise, but this time try to touch the other elbow to your opposite
knee.
• Repeat the desired repetitions.
Tips:
• Try kneeling further away than usual to make the exercise harder.
• If you have sensitive knees it is recommended that you use a mat or something comfortable underneath your knees.
7. Standing Oblique Cable Twists
Starting Position:
• Begin by setting the cable pulley on a cable tower to shoulder level.
• Use a standard single handle bar attachment.
• Stand with your side towards the cable tower.
• Grasp grip with hand closest to the grip so that your palm is facing inward
toward you.
• Grasp grip with other hand on grip so that your palm is facing inward toward
tower. This grip will be overlapping your other hand.
• Side step out until you feel the resistance with straight arms out to your
side.
• Maintain an upright and straight torso.
• No twisting should be present in your torso or legs.
• You should be standing straight up with our arms straight and pulled towards
your side (tower side).
Upward Phase:
• Initiate movement by first contracting your abs.
• Then slowly twist your arms in a semicircular motion from you side to in front
on you.
• Arms should remain straight throughout motion.
• Stop when you reach just past 90 degrees or rotation (arms straight out in
front of body).
• Keep head, neck, torso, and legs straight forward and motionless.
Downward Phase:
• In a controlled manner, slowly allow your arms to make a semicircular path
back to the starting position.
• Arms should remain straight.
• Do not allow the torso to twist.
• Repeat the desired amount of repetitions on this side.
• Then repeat on the other side obliques.
Tips:
• Keep in mind that your body is at a mechanical disadvantage here and the
weight you will use will not be very heavy. Light weight is all that’s needed.
• Try experimenting with cable pulley height so twisting can occur at an angle.
• If you knees begin to bother you, try slightly bending them during the
exercise.
8. Wood Chops
Starting Position:
• Begin by setting the cable pulley on a cable tower to the top level.
• Be sure to put on a single grip attachment.
• Stand with your side facing the cable tower.
• Grasp the grip with the cable tower side arm.
• Then grasp the grip with the other arm. Overlapping of hands will occur.
• You should be standing straight and tall with feet shoulder width apart and
knees slightly bent. Arms should be up and out the side with a slight bend
at the elbows.
• If you are not in this position try lowering the cable pulley height.
Downward Phase:
• Contract your obliques to initiate the movement.
• Follow this with your arms as you make a chopping movement in a downward
diagonal motion to the opposite side of the cable tower.
• Be sure to not hoist the weight down with momentum.
• Be sure to keep a slight bend at the elbows and don’t allow more bending or
straightening to occur.
• Movement is complete when your arms are straight across you at a diagonal
angle.
Upward Phase:
• Allow weight to slowly be pulled in an upward diagonal direction.
• Control this movement. Do not let the weight crash.
• Keep elbows slightly bent.
• Keep head and neck straight and facing forward.
Tips:
• Try using a rope attachment on the cable tower for an extra squeeze on those obliques.
• Try to focus on using your obliques to pull weight down. The tendency will be for you to use your arms to pull weight down. Initiate movement with the abs.