If you've found this website helpful, please click the Donate button. Thanks for the support.
Find this page useful and think someone else might too? Share it!
Find this page useful and think someone else might too? Share it!
Exercise Guide

Like the site? Sign up for the FREE newsletter. I'll send a new article once or twice a month. Unsubscribe
anytime.
anytime.

About this Site l Contact l Free Newsletter l Subscribe to Rss Feed
Recommended Products l Fitness Store l Directly Fitness Blog
Recommended Products l Fitness Store l Directly Fitness Blog
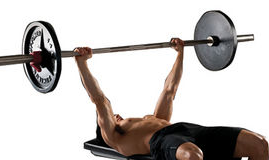
1. The Dead Lift:
Note: This is a complex movement and takes practice before attempting to move heavy weight. This movement can be mastered using only your own body weight first to avoid injury.
Starting Position:
• Begin by standing in front of a barbell on the ground, feet slightly
wider than shoulder width, with toes pointed slight out.
• If you find this exercise too challenging for the mechanics of your
legs, try moving feet wider as this will open up your thighs and
increase your base of support.
• Your shins should be touching or very close to the barbell.
• Squat down so you can comfortably grip the bar with arms remaining
vertical.
• One hand should be using a supinated grip (palms up) while the
other using a pronated grip (overhand grip.
• Be sure to keep your buttocks low to the ground.
• Upper body and head should be straight with an upright posture and
tight abdominals.
• Your chest and buttocks sticking should look as if you are sticking
them out.
Upward Phase:
• Begin by contracting your traps and tensing the connection between
the bar and your arms.
• Drive your heels into the ground and contract your buttocks while
extending at the knees.
• The two previous steps should be done essentially at the same time
(this is where practice comes in).
• Keep chest out, keep a slight arch in the small of your back, and
don’t round back! This is the most common mistake and will lead to
injury.
• Always concentrate on keeping your buttocks low and this will reduce
rounding of the back.
• Throughout movement keep the bar as close to your body as
possible. Even letting the bar ride up your shins and thighs is ideal
(wear pants or this may hurt).
• As you begin to reach the end of the movement, be sure to not lean
forward. Lean back slightly as knees are full extended. This is the end
of the up ward phase.
Downward Phase
• Abs should be contracted throughout the movement. This is
important as it will keep the pressure around your core tight. It is
your “natural belt” which mimics many common power lifting belt.
• If you feel your core is weak, train this first and then attempt the
dead lift.
• Slowly lower the bar with your chest and buttocks sticking out.
• Make sure your body is upright!
• It is ideal to lower the bar as close to your legs as you can, just as in
the upward phase.
• It helps to keep upright posture by looking up while lowering (Neck
extension naturally influences the rest of the spine to extend).
• Make sure buttocks stays lower than your upper body as you descend.
• Movement is complete when weight touches the ground. Avoid
dropping the weight to the ground as this can damage the floor and
very unpleasant to fellow gym members.
2. Quadriceps Knee extensions:
Note: These can be done both on a machine and with ankle cuff weights. It is almost guaranteed that a knee extension machine will be at any gym you attend while ankle weights are very useful, but less common in public recreation gyms.
Starting Position:
• Begin by adjusting the seat height and the seat length. It will take a
little shifting around to get the settings right for your height. Make
sure the pad is overlapping ABOVE the tops of the knees on the quadriceps.
Right on it or below may cause injury.
• Back should be flat and press against back support pad. Avoid arching
of the back.
• Once seated and the pad firmly adjusted to the tops of your thighs
with legs hanging at a 90 degree angle you are good to go.
Upward Phase:
• Initiate the movement by bending extending the quadriceps at the knees in a
“kicking” motion.
• Avoid fast or jerky motions.
• Movement is complete right before knee lockout (full extension is bad
for your knees).
Downward Phase:
• Slowly lower your legs back down to the starting position avoiding
fast movement.
3. Leg Press (Low foot position):
Starting Position:
• Position yourself in the seated position within the leg press machine.
• Adjust the length of the seat so that your back is flat and firmly
pressed against it.
• Make sure your knees are near 90 degrees in this starting position.
• Place feet shoulder width apart and higher up on the platform
(approx. ¾ the way up).
• Hold onto hand rails if present.
Upward Phase:
• Press against platform to lift weight off a few inches.
• Unlock the weight from the weight rack. Feel the weight shift to your
legs.
• Slowly press against the platform with your legs extending at the
knees contracting the quadriceps.
• Be sure not to arch your back.
• Try to keep heels stable on platform.
• The naturally tendency will be to press out with your toes and lift
heels off the platform.
• Pressing with the toes is ok as long as heels don’t come off platform.
• Don’t press into full knee extension, stop just shy to keep tension on
quadriceps and avoid injury.
Downward Phase:
• Slowly lower the weight back down to the starting position.
• Do not allow weight to speed back at you.
• Lock the weight and slowly take feet off to make sure weight is properly
locked on rack.
4. Lunge (with dumbbells):
Starting Phase:
• Begin by picking up dumbbells with both hands standing up tall.
• Arms should be resting with weights on both sides of your body.
Downward Phase:
• Take a moderate sized step forward (about 2-4 feet depending on your
height).
• Let arms hang at side with weight throughout movement.
• Keep torso and head tall and straight.
• Chest should be out while contracting your abdominals throughout.
• Lower until your front knee reaches about 90 degrees and your upper thigh
is parallel with the floor.
• Back foot should also be bend at about 90 degrees with toes planted and
heel off the floor.
Upward Phase:
• Contract the quadriceps as you press with your front foot in a backwards
motion to stand upright again.
• Maintain upright head and torso posture as well as abdominal contracture.
• If you press too lightly you will not be able to reach your standing
position.
• Experiment this exercise without weight first and then perform with
weight.
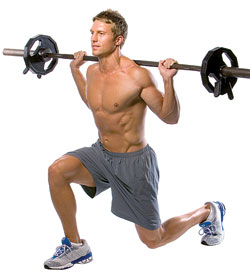
5. Lunge (With barbell):
Note: It is beneficial to first master lunges with dumbbells and then move on to using the barbell. Test your ability, strength, and coordination first by using only the barbell with no added weigh to get a feel for the movement. Practice makes perfect
Starting Phase:
• Begin by lining the back of your neck with the bar as it rest on your shoulders.
• Bar should be racked at a height about 1/2 to 3/4 foot less than your max
height.
• Grip bar a little wider than shoulder width.
• Bend at knees and assume a “squatting” position.
Downward Phase:
• Carefully press off the ground slightly to get bar off rack.
• Step back from rack far enough to lunge with plenty of room.
• Make sure you have plenty of room on either side of you as well. This will
prevent hurting others that may be walking around you during this exercise.
• Maintain head and trunk upright posture.
• Keep a tightened abdominal contraction.
• Take a moderate step length forward with either leg (2-4 feet).
• Make sure you feel comfortable with the depth of your step as to not loose
balance.
• Slowly bend your front leg until it reaches at or below 90 degrees.
• Rear leg should also passively bend to about 90 degrees when you do this.
• Be sure not to lean forward! This can lead to injury and upright posture is the
key!
Upward Phase:
• Press off the ground in a forceful manner with the front foot.
• Your front knee should extend, sending you back into the upright standing
position as you contract your quadriceps.
• Keep good upright trunk and head posture and tight abdominals.
• Repeat with other leg
6. One-Legged Dumbbell Squats:
Starting Phase:
• Begin by standing in front of a bench about knee height facing away from it.
• Step far enough away from the bench with the front leg so knee is directly
over your ankle.
• Place either leg back so shin is resting on the back edge of the bench.
• The leg that is back on the bench will be the balance support leg while the leg
in front planted on the ground will be the leg exercised.
• At this point, front leg should be relatively straight and rear leg should be
about 90 degrees.
• Stand up tall, stick chest out, keep head straight forward, and tighten
abdominals.
• Arms should be resting at sides throughout movement with dumbbells in
hands.
Downward Phase:
• Begin lowering your body in a straight descent by flexing at your knee with the
front leg.
• The rear leg is for balance and support.
• Keep upright posture in your neck and head.
• Be sure to keep abdominals tight.
• Lower until your front leg reaches 90 degrees.
Upward Phase:
• Press up with your front leg as you contract your quadriceps.
• Don’t lock out knee, stop just short of full leg extension.
• Try not to press into the bench with your rear leg.
• Focusing contracting your buttocks of the front pressing leg will prevent this.
• Keep good posture throughout movement.
• Repeat with a given number of reps with the same foot in front.
• Then switch and perform the exercise with the rear leg this time.
7. Squats
Note: This is a complex exercise to perform correctly. Try practicing this motion with just your own body weight before proceeding to use dumbbells or a barbell. I will explain using a barbell as this is the most complex. If using your own bodyweight simply cross your arms across your chest. The rest of the exercise is the same movement.
Starting position:
• Begin by standing in front of a racked barbell.
• Be sure that your max height is about ½ to ¾ taller than the barbell.
• Back up so back of neck is touching barbell and bar is resting on shoulders.
• Press feet into ground through heels to lift bar slightly off the rack (extending
legs).
• Back up so there is enough clearance in front and below you (some racks have
“safety” bars about 3 feet off the ground should you fall with the weight).
• Feet should be slight wider than shoulder width apart and toes slightly pointed
out from neutral.
• This is the squat starting position.
Downward Phase:
• Keep your head straight or look up if you prefer (many find it easier to
maintain upright posture by looking up).
• Be sure to keep this upright posture and abdominals tight!
• Don’t lean forward at any point in the movement. This can lead to injury!
• Stick butt out and slowly lower yourself concentrating on shifting most of your
weight through your heels, not your toes.
• Lower slowly until your knees are flexed to about 90 degrees.
• Squats can also be done with “partial reps” if you don’t feel comfortable going
down that far.
• Be sure to inhale on your way down.
Upward Phase:
• Drive your feet into the ground while contracting your buttocks.
• Try to concentrate using force from your heels rather than your toes.
• Exhale during this phase of the exercise.
• Be sure not to lean too far forward or backward.
• Your natural tendency will be to lean forward but keep your chest out and
straight posture.
• Keep knees in line and don’t let them wobble in or out excessively.
• It will take practice to keep a good posture during this exercise.
• Once you are back in the starting position you can either repeat or re rack the
bar by stepping forward and placing bar appropriately.
• Be sure to slowly dip away from bar just in case the bar isn’t racked properly
Note: This is a complex movement and takes practice before attempting to move heavy weight. This movement can be mastered using only your own body weight first to avoid injury.
Starting Position:
• Begin by standing in front of a barbell on the ground, feet slightly
wider than shoulder width, with toes pointed slight out.
• If you find this exercise too challenging for the mechanics of your
legs, try moving feet wider as this will open up your thighs and
increase your base of support.
• Your shins should be touching or very close to the barbell.
• Squat down so you can comfortably grip the bar with arms remaining
vertical.
• One hand should be using a supinated grip (palms up) while the
other using a pronated grip (overhand grip.
• Be sure to keep your buttocks low to the ground.
• Upper body and head should be straight with an upright posture and
tight abdominals.
• Your chest and buttocks sticking should look as if you are sticking
them out.
Upward Phase:
• Begin by contracting your traps and tensing the connection between
the bar and your arms.
• Drive your heels into the ground and contract your buttocks while
extending at the knees.
• The two previous steps should be done essentially at the same time
(this is where practice comes in).
• Keep chest out, keep a slight arch in the small of your back, and
don’t round back! This is the most common mistake and will lead to
injury.
• Always concentrate on keeping your buttocks low and this will reduce
rounding of the back.
• Throughout movement keep the bar as close to your body as
possible. Even letting the bar ride up your shins and thighs is ideal
(wear pants or this may hurt).
• As you begin to reach the end of the movement, be sure to not lean
forward. Lean back slightly as knees are full extended. This is the end
of the up ward phase.
Downward Phase
• Abs should be contracted throughout the movement. This is
important as it will keep the pressure around your core tight. It is
your “natural belt” which mimics many common power lifting belt.
• If you feel your core is weak, train this first and then attempt the
dead lift.
• Slowly lower the bar with your chest and buttocks sticking out.
• Make sure your body is upright!
• It is ideal to lower the bar as close to your legs as you can, just as in
the upward phase.
• It helps to keep upright posture by looking up while lowering (Neck
extension naturally influences the rest of the spine to extend).
• Make sure buttocks stays lower than your upper body as you descend.
• Movement is complete when weight touches the ground. Avoid
dropping the weight to the ground as this can damage the floor and
very unpleasant to fellow gym members.
2. Quadriceps Knee extensions:
Note: These can be done both on a machine and with ankle cuff weights. It is almost guaranteed that a knee extension machine will be at any gym you attend while ankle weights are very useful, but less common in public recreation gyms.
Starting Position:
• Begin by adjusting the seat height and the seat length. It will take a
little shifting around to get the settings right for your height. Make
sure the pad is overlapping ABOVE the tops of the knees on the quadriceps.
Right on it or below may cause injury.
• Back should be flat and press against back support pad. Avoid arching
of the back.
• Once seated and the pad firmly adjusted to the tops of your thighs
with legs hanging at a 90 degree angle you are good to go.
Upward Phase:
• Initiate the movement by bending extending the quadriceps at the knees in a
“kicking” motion.
• Avoid fast or jerky motions.
• Movement is complete right before knee lockout (full extension is bad
for your knees).
Downward Phase:
• Slowly lower your legs back down to the starting position avoiding
fast movement.
3. Leg Press (Low foot position):
Starting Position:
• Position yourself in the seated position within the leg press machine.
• Adjust the length of the seat so that your back is flat and firmly
pressed against it.
• Make sure your knees are near 90 degrees in this starting position.
• Place feet shoulder width apart and higher up on the platform
(approx. ¾ the way up).
• Hold onto hand rails if present.
Upward Phase:
• Press against platform to lift weight off a few inches.
• Unlock the weight from the weight rack. Feel the weight shift to your
legs.
• Slowly press against the platform with your legs extending at the
knees contracting the quadriceps.
• Be sure not to arch your back.
• Try to keep heels stable on platform.
• The naturally tendency will be to press out with your toes and lift
heels off the platform.
• Pressing with the toes is ok as long as heels don’t come off platform.
• Don’t press into full knee extension, stop just shy to keep tension on
quadriceps and avoid injury.
Downward Phase:
• Slowly lower the weight back down to the starting position.
• Do not allow weight to speed back at you.
• Lock the weight and slowly take feet off to make sure weight is properly
locked on rack.
4. Lunge (with dumbbells):
Starting Phase:
• Begin by picking up dumbbells with both hands standing up tall.
• Arms should be resting with weights on both sides of your body.
Downward Phase:
• Take a moderate sized step forward (about 2-4 feet depending on your
height).
• Let arms hang at side with weight throughout movement.
• Keep torso and head tall and straight.
• Chest should be out while contracting your abdominals throughout.
• Lower until your front knee reaches about 90 degrees and your upper thigh
is parallel with the floor.
• Back foot should also be bend at about 90 degrees with toes planted and
heel off the floor.
Upward Phase:
• Contract the quadriceps as you press with your front foot in a backwards
motion to stand upright again.
• Maintain upright head and torso posture as well as abdominal contracture.
• If you press too lightly you will not be able to reach your standing
position.
• Experiment this exercise without weight first and then perform with
weight.
5. Lunge (With barbell):
Note: It is beneficial to first master lunges with dumbbells and then move on to using the barbell. Test your ability, strength, and coordination first by using only the barbell with no added weigh to get a feel for the movement. Practice makes perfect
Starting Phase:
• Begin by lining the back of your neck with the bar as it rest on your shoulders.
• Bar should be racked at a height about 1/2 to 3/4 foot less than your max
height.
• Grip bar a little wider than shoulder width.
• Bend at knees and assume a “squatting” position.
Downward Phase:
• Carefully press off the ground slightly to get bar off rack.
• Step back from rack far enough to lunge with plenty of room.
• Make sure you have plenty of room on either side of you as well. This will
prevent hurting others that may be walking around you during this exercise.
• Maintain head and trunk upright posture.
• Keep a tightened abdominal contraction.
• Take a moderate step length forward with either leg (2-4 feet).
• Make sure you feel comfortable with the depth of your step as to not loose
balance.
• Slowly bend your front leg until it reaches at or below 90 degrees.
• Rear leg should also passively bend to about 90 degrees when you do this.
• Be sure not to lean forward! This can lead to injury and upright posture is the
key!
Upward Phase:
• Press off the ground in a forceful manner with the front foot.
• Your front knee should extend, sending you back into the upright standing
position as you contract your quadriceps.
• Keep good upright trunk and head posture and tight abdominals.
• Repeat with other leg
6. One-Legged Dumbbell Squats:
Starting Phase:
• Begin by standing in front of a bench about knee height facing away from it.
• Step far enough away from the bench with the front leg so knee is directly
over your ankle.
• Place either leg back so shin is resting on the back edge of the bench.
• The leg that is back on the bench will be the balance support leg while the leg
in front planted on the ground will be the leg exercised.
• At this point, front leg should be relatively straight and rear leg should be
about 90 degrees.
• Stand up tall, stick chest out, keep head straight forward, and tighten
abdominals.
• Arms should be resting at sides throughout movement with dumbbells in
hands.
Downward Phase:
• Begin lowering your body in a straight descent by flexing at your knee with the
front leg.
• The rear leg is for balance and support.
• Keep upright posture in your neck and head.
• Be sure to keep abdominals tight.
• Lower until your front leg reaches 90 degrees.
Upward Phase:
• Press up with your front leg as you contract your quadriceps.
• Don’t lock out knee, stop just short of full leg extension.
• Try not to press into the bench with your rear leg.
• Focusing contracting your buttocks of the front pressing leg will prevent this.
• Keep good posture throughout movement.
• Repeat with a given number of reps with the same foot in front.
• Then switch and perform the exercise with the rear leg this time.
7. Squats
Note: This is a complex exercise to perform correctly. Try practicing this motion with just your own body weight before proceeding to use dumbbells or a barbell. I will explain using a barbell as this is the most complex. If using your own bodyweight simply cross your arms across your chest. The rest of the exercise is the same movement.
Starting position:
• Begin by standing in front of a racked barbell.
• Be sure that your max height is about ½ to ¾ taller than the barbell.
• Back up so back of neck is touching barbell and bar is resting on shoulders.
• Press feet into ground through heels to lift bar slightly off the rack (extending
legs).
• Back up so there is enough clearance in front and below you (some racks have
“safety” bars about 3 feet off the ground should you fall with the weight).
• Feet should be slight wider than shoulder width apart and toes slightly pointed
out from neutral.
• This is the squat starting position.
Downward Phase:
• Keep your head straight or look up if you prefer (many find it easier to
maintain upright posture by looking up).
• Be sure to keep this upright posture and abdominals tight!
• Don’t lean forward at any point in the movement. This can lead to injury!
• Stick butt out and slowly lower yourself concentrating on shifting most of your
weight through your heels, not your toes.
• Lower slowly until your knees are flexed to about 90 degrees.
• Squats can also be done with “partial reps” if you don’t feel comfortable going
down that far.
• Be sure to inhale on your way down.
Upward Phase:
• Drive your feet into the ground while contracting your buttocks.
• Try to concentrate using force from your heels rather than your toes.
• Exhale during this phase of the exercise.
• Be sure not to lean too far forward or backward.
• Your natural tendency will be to lean forward but keep your chest out and
straight posture.
• Keep knees in line and don’t let them wobble in or out excessively.
• It will take practice to keep a good posture during this exercise.
• Once you are back in the starting position you can either repeat or re rack the
bar by stepping forward and placing bar appropriately.
• Be sure to slowly dip away from bar just in case the bar isn’t racked properly
HOW TO EXERCISE
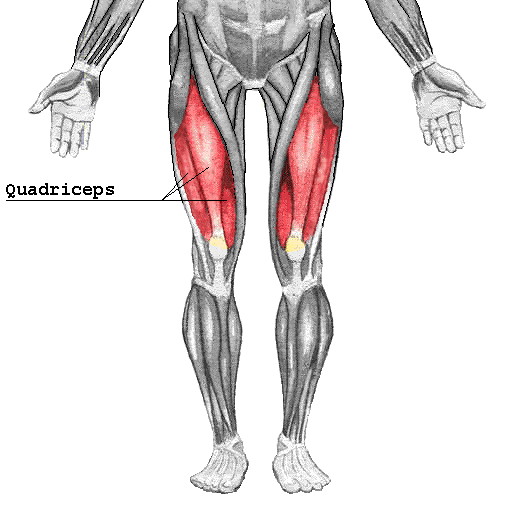
Quadriceps Exercises:
(In order of appearance)
1. Dead Lift
2. Knee Extensions
3. Leg Press (Modified)
4. Lunge (Dumbbells)
5. Lunge (Barbell)
6. One-Legged Squat
7. Squat (Barbell)
(In order of appearance)
1. Dead Lift
2. Knee Extensions
3. Leg Press (Modified)
4. Lunge (Dumbbells)
5. Lunge (Barbell)
6. One-Legged Squat
7. Squat (Barbell)
Exercises:
QUADRICEPS